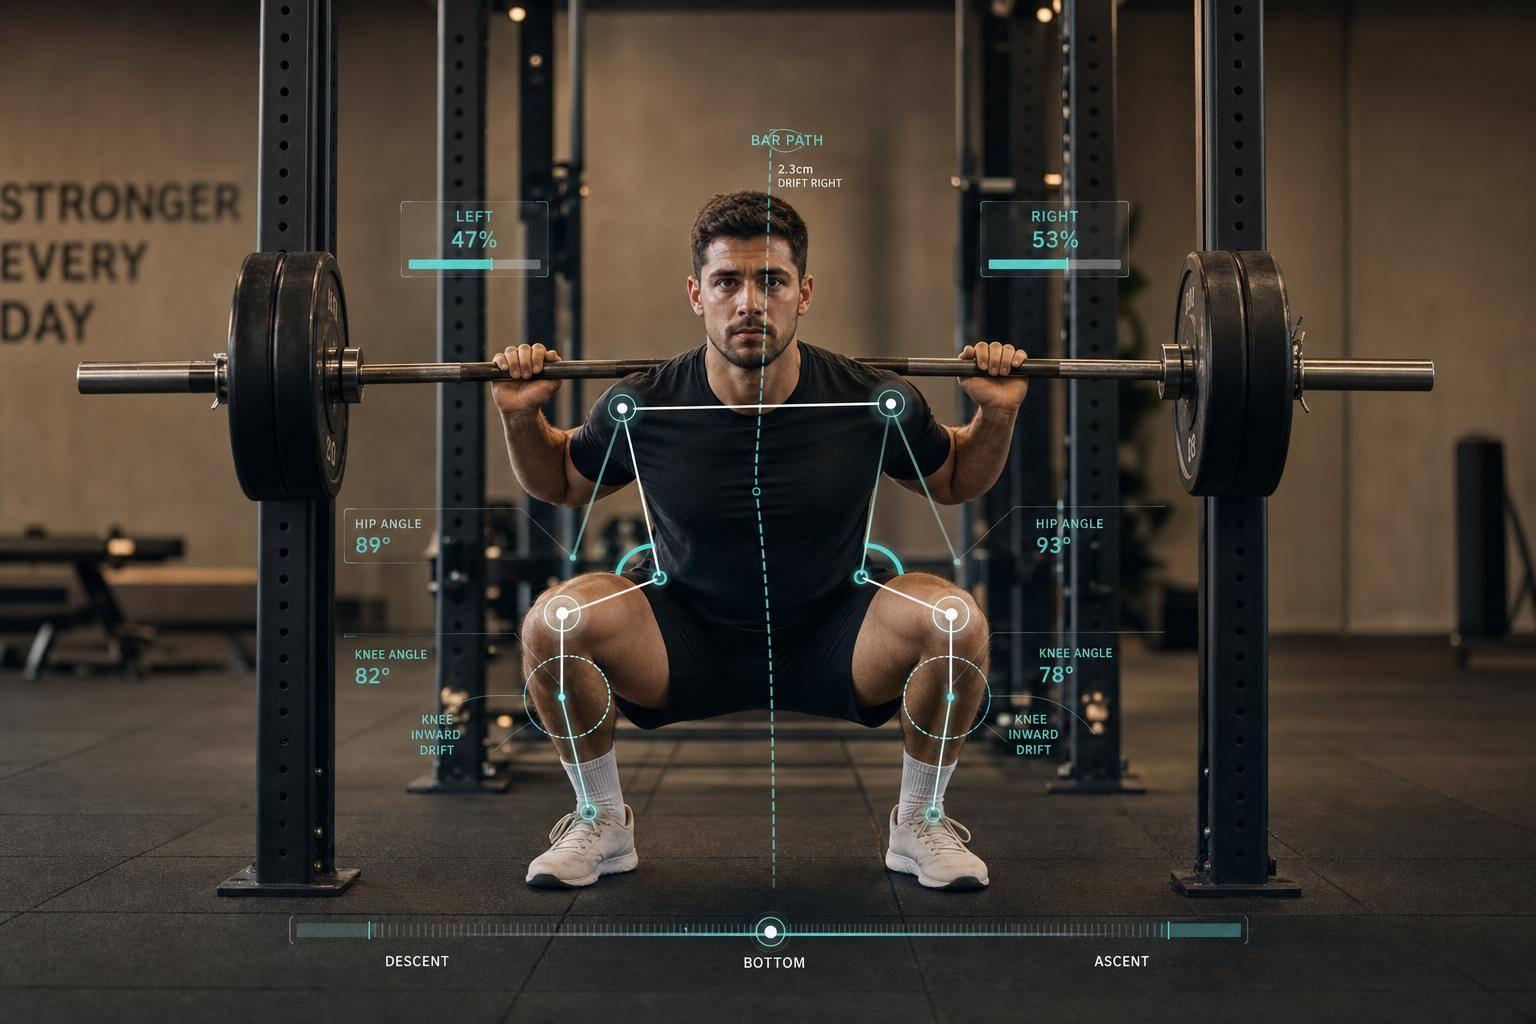
How AI Detects Posture Imbalances in Lifts
AI lift analysis turns video into joint-angle data, then checks where your form shifts during the rep. In plain terms: I can film a squat, bench, or deadlift, and the system can spot knee cave, hip shift, trunk lean, bar drift, or uneven lockout that I might miss in real time.
Here’s the short version:
- It tracks joints frame by frame from a standard video
- It checks the rep by phase: setup, mid-rep, bottom or touch, and lockout
- It flags side-to-side differences and form drift under load
- It uses cutoffs and movement patterns to sort small issues from higher-risk ones
- It works best with clean video: full body in frame, steady camera, good lighting, and the right angle for the lift
- It helps most when I compare trends across weeks, not just one set
A few numbers matter here. Research often links inter-limb differences above 10%–15% with more injury risk. Some systems also flag knee valgus around 9°–13° as a warning zone, with 13°+ treated as higher risk. That means the goal is not just to say, “your rep looked off.” It’s to show what moved, when it changed, and what to fix next.
The core idea is simple: good AI feedback depends on two things - solid joint tracking and clear lift-specific checks. When those are in place, video becomes a tool I can use to clean up form, manage drift under heavy weight, and track whether a problem keeps showing up or was just a one-day issue.
Creating Your Own AI Fitness Trainer: Analyzing Squats with MediaPipe
How AI Reads the Lifter's Body from Video
AI reads a lift by finding body landmarks in each frame, then measuring how those points move through the rep. It does this with markerless pose estimation, which identifies body landmarks from standard video. That matters because imbalances tend to show up as side-to-side drift, joint collapse, or uneven joint angles.
Markerless Pose Estimation and Joint Tracking
The main points to track are the ankles, knees, hips, torso, shoulders, elbows, wrists, and head. Together, these points help the AI spot uneven movement, not just motion in general.
From there, the system builds a skeletal model and calculates joint angles tied to the lift. That includes knee flexion from the hip-knee-ankle relationship, hip hinge from the hip-to-torso angle, torso lean, and shoulder and elbow alignment during pressing positions. The result is frame-by-frame joint-angle data across the full rep.
That full-rep view is the key part. A single frame can look fine, while the full movement shows a clear shift in hip, knee, or torso position. So the system looks for drift over time, not just one frozen moment. Once those angles are mapped, it can compare them with the positions that matter in each lift.
Video Setup That Improves Detection Accuracy
The quality of the analysis depends on what the camera can see. If joints are blocked, cropped, or hard to make out in poor lighting, tracking gets weaker. And when visibility drops, the system can miss the very imbalances it's supposed to catch.
A good setup is simple:
- Keep the full body in frame
- Use a stable camera
- Make sure the limbs stay visible
- Shoot in even lighting
Camera angle matters too. A side view works best for checking torso angle and hip hinge in a deadlift. A front or rear view works better for spotting knee cave or hip shift in a squat. Match the camera angle to the lift, and the system has a much better shot at telling the difference between real posture drift and a bad viewing angle.
With the body mapped clearly, the next step is checking the lift-specific positions that reveal hidden breakdowns.
Which Lift Positions the Algorithm Checks
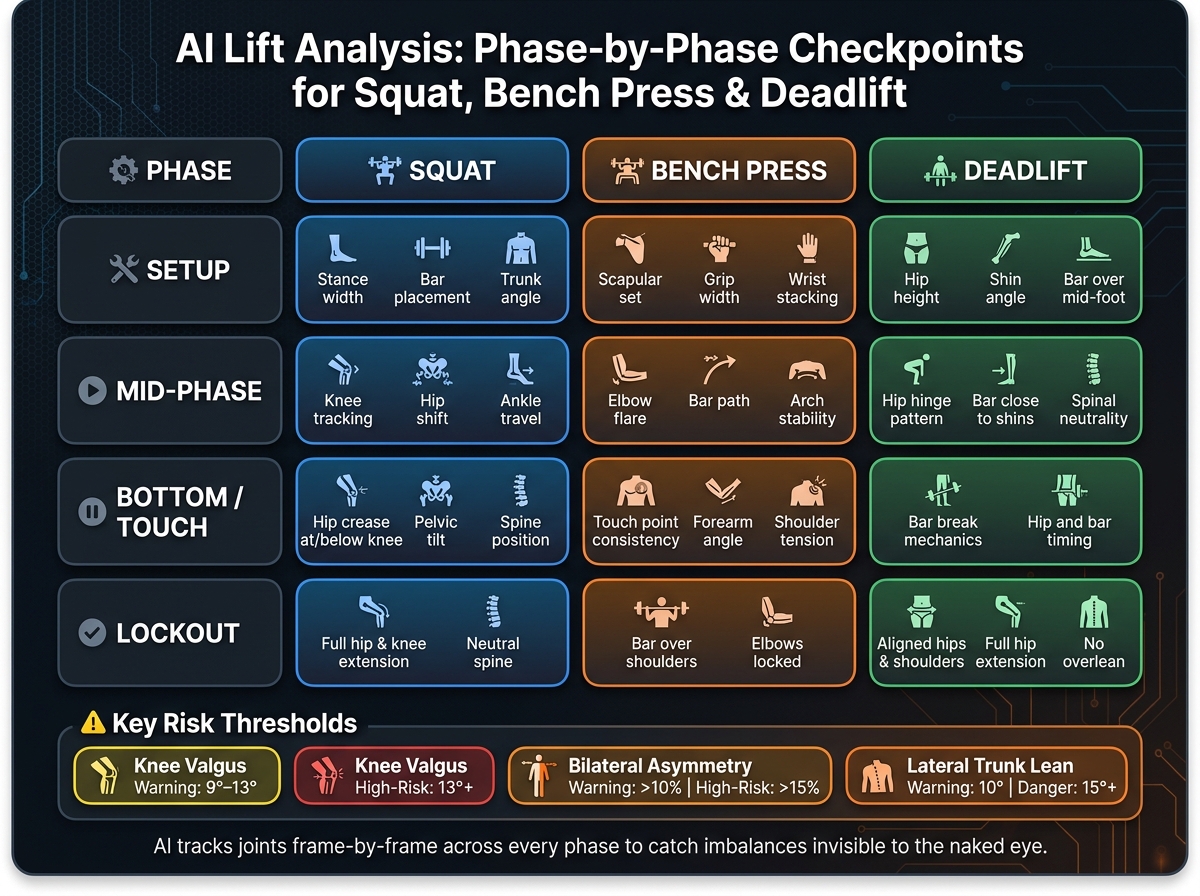
AI Lift Analysis: Phase-by-Phase Checkpoints for Squat, Bench Press & Deadlift
Once the joints are mapped, the algorithm checks the rep phase by phase: setup, descent, bottom, and lockout.
Squat, Bench Press, and Deadlift Checkpoints
Each lift has its own positions the system pays attention to.
For the squat, it starts with stance width, bar placement, and trunk angle during setup. As the lifter descends, it tracks knee alignment over the toes, hip shift, and ankle travel. At the bottom, it checks whether the hip crease reaches knee level, along with pelvic tilt and spine position. On the way up, it looks at whether the hips and shoulders rise together or whether the lifter shifts to one side under strain.
For the bench press, the algorithm begins with scapular position and wrist stacking at setup. During the lowering phase, it monitors elbow flare, bar path, and arch stability. At the touch point, it checks whether the bar touches the lower chest each time, whether the forearms stay vertical or slightly angled, and whether the shoulders stay stable. Through the press and into lockout, it confirms that the bar moves back over the shoulders and that the elbows finish fully extended.
For the deadlift, setup checks include hip height, shin angle, back position, and whether the bar sits over mid-foot. As the bar breaks from the floor, the system tracks hip rise against bar elevation and checks spine position. Through the mid-pull and into lockout, it flags the bar drifting away from the body and checks for full hip extension without overlean at lockout.
| Checkpoint | Squat | Bench Press | Deadlift |
|---|---|---|---|
| Setup | Stance width, bar placement, trunk angle | Scapular set, grip width, wrist stacking | Hip height, shin angle, bar over mid-foot |
| Mid-Phase | Knee tracking, hip shift, ankle travel | Elbow flare, bar path, arch stability | Hip hinge pattern, bar close to shins, spinal neutrality |
| Bottom / Touch | Hip crease at or below knee level, pelvic tilt, spine position | Touch point consistency, forearm angle, shoulder tension | Bar break mechanics, hip and bar timing |
| Lockout | Full hip and knee extension, neutral spine | Bar over shoulders, elbows locked | Aligned hips and shoulders, full hip extension, no overlean |
How Phase-Based Analysis Catches Hidden Errors
Some imbalances don't show up at the top of a lift. They appear only under load, at a certain moment in the rep.
Knee valgus is a good example. A lifter's knees may track well through most of the squat descent, then cave inward near the bottom, right when the load is hardest to control. A single screenshot from the top or bottom would miss that.
The same thing happens in the deadlift. If the hips rise faster than the bar early in the pull, the movement shifts from a hip hinge toward something closer to a stiff-legged pull. That timing issue only appears when the algorithm compares hip and bar movement through the off-the-floor phase.
By linking joint angles to each phase, the system shows when the breakdown starts and turns that into a specific cue.
Those phase-specific flags become the coaching cues in the next step.
How AI Identifies Posture Imbalances and Turns Them Into Feedback
After tracking the rep, the system checks each deviation against a lift template, a cutoff, or your own baseline. That choice shapes what the system can spot. Some methods catch obvious faults. Others are better at noticing small drift that builds over time.
| Approach | What It Measures | How It Detects Errors | Where It Works Best |
|---|---|---|---|
| Rule-based checks | Joint angles, segment alignment, bar path, depth | Compares against predefined angle ranges and pass/fail cutoffs | Clear feedback on well-defined issues like depth, knee tracking, and spinal alignment |
| Pose-estimation pipelines | Joint-angle trajectories, trunk position, bar path | Quantifies deviations from a reference movement pattern across the rep | Tracking how form changes across reps and sessions |
| Sequence models (RNNs/LSTMs) | Temporal patterns in joint angles and bar trajectories | Learns normal movement sequences and flags subtle anomalies | Detecting early breakdowns and fatigue-related drift |
A lot of consumer tools now use a hybrid of the first two. They use pose estimation to produce raw kinematic data, then apply rule-based logic once the system knows which phase of the lift you're in. Put simply, one part tracks the movement, and the other part decides whether that movement is off.
What the System Flags During a Rep
AI can flag measurable issues like asymmetry, drift, and excess spinal flexion. Once the system defines what counts as a deviation, it can start tagging repeatable error patterns during the rep.
Research-backed systems rely on explicit angle thresholds to sort risk. For example, a dynamic knee valgus angle between 9° and 13° usually triggers a warning, while anything above 13° is marked high-risk. Bilateral asymmetry in knee valgus above 10° triggers a warning, and above 15° is treated as high-risk. Lateral trunk lean works in a similar way, with warnings starting at 10° and danger above 15° [1].
Beyond knee tracking and trunk lean, systems often flag:
- Left-right asymmetry
- Bar path drift
- Excessive spinal flexion
- Elbow flare during the bench press
- Stance or grip asymmetry
That said, a flag by itself doesn't help much. If the app tells you something went wrong but doesn't tell you what to change, you're still stuck.
From Raw Measurements to Actionable Coaching Cues
Detecting a problem only matters if the output tells you what to do next. The best systems turn raw measurements into a small set of usable feedback: a technique score for a quick snapshot of overall quality, severity flags that separate smaller issues from higher-priority fixes, and specific cues tied to the exact point in the rep where the breakdown happened.
CueForm AI uses this model for squat, bench press, and deadlift videos. It turns flags into personalized cues based on what the system found in your movement. You can also follow up through an AI chat coach to ask questions and get guidance tied to your own goals.
That output matters because it surfaces the biggest risk first and gives you the next cue to work on.
How to Get Reliable Results and Apply Them in Training
Camera Setup Rules for Better Analysis
Once the algorithm knows what to track, video quality becomes the deciding factor. It shapes whether the feedback reflects actual posture drift or just bad footage. Put plainly: the system can only read what the camera gives it. A 2023 study found smartphone video can match motion-capture lab data closely when capture conditions are controlled.[2]
A few setup rules make a clear difference:
- Full body in frame: Keep your head, feet, barbell, and major joints visible through the entire rep.
- Correct angle for the lift: For squats, use a side view or a 45° angle from the front or rear. For deadlifts, use a side view or a slight 45° angle at hip height. For the bench press, film from the side or a slight diagonal near your feet so the rack uprights don't block your shoulders or bar path.
- No obstructions: Plates, safety arms, and rack uprights often block the hips and knees. Pick an angle that looks through the rack opening instead of straight into it.
- Stable camera: A tripod or a firmly propped phone cuts motion blur that can throw off joint tracking.
- Good contrast: Wear clothes that stand out from the background, and avoid dark corners or backlighting.
Once the video is clean, the next step is to compare the same lift under the same conditions over time.
If the AI gives you shaky joint tracks, loses joints mid-rep, or returns vague feedback, don't assume your movement is the issue right away. First, adjust the angle, fix the lighting, and record again. CueForm AI can prompt you to move the camera or clear obstructions before you resubmit.
Using Technique Trends to Improve Over Time
One session can show a mistake. Repeated sessions show a pattern. That's where this kind of analysis starts to pay off.
A practical approach is to record one or two top sets per lift once or twice a week, then compare how your asymmetry scores and posture flags change across sessions. A 2024 study found markerless motion capture remained reliable across days for kinematic measures in a 14-movement screen.[3]
Consistency in recording conditions matters as much as consistency in training. Mark your camera spot on the floor with tape. Note the height and angle. Try to use the same device, angle, lighting, and frame rate each time. Even small camera shifts can change how knee valgus or trunk lean appears to the algorithm, which makes session-to-session comparisons messier.
When the same flag shows up for several weeks, treat it like a real movement pattern. That's the time to adjust load, stance, or accessory work. If a flag appears once and then vanishes, it's more likely tied to fatigue or a setup issue that day. The trend is what helps you tell the difference between a real fix and a guess.
FAQs
Can AI detect form issues from a phone video?
Yes. AI can review a phone video frame by frame, turn your body into a digital skeleton, and track things like joint angles, movement tempo, and bar path.
From there, it checks those data points against biomechanical rules and learned movement patterns to flag issues such as knee valgus, spinal rounding, or uneven depth.
For the best read, film your full body in a clear, steady, well-lit shot from about 8 to 12 feet away, with the camera set around hip-to-waist height.
How accurate is AI lift analysis for squats, bench, and deadlifts?
AI lift analysis for squats, bench presses, and deadlifts is highly precise. In controlled settings, smartphone-based computer vision systems usually reach 90% to 95% accuracy. They can measure joint angles within about 2.5 degrees and track barbell position within roughly 1 inch.
Video-based AI can also flag form issues like knee valgus, spinal rounding, and bar path drift. In many cases, its feedback lines up with expert coaches at about 80% to 90% agreement.
How often should I record lifts to track real form changes?
Record your lifts at least weekly so you can track actual changes in technique scores and movement symmetry. If you want clean comparisons, keep the camera angle the same each time, ideally from the same side view in every session.
A simple way to review your footage is to look at:
- Your first set for a baseline
- Your heaviest set to see what happens under load
- Your final set to spot fatigue-related breakdown
After you get feedback, work on one correction at a time. Then check your next session to see if that change shows up in your form.