CueForm training guides
Deadlift Form: How to Set Up, Pull, and Fix Common Mistakes
Five setup steps, the mistakes that show up on video, and one change to try on your next set.
Proper deadlift form in four cues
-
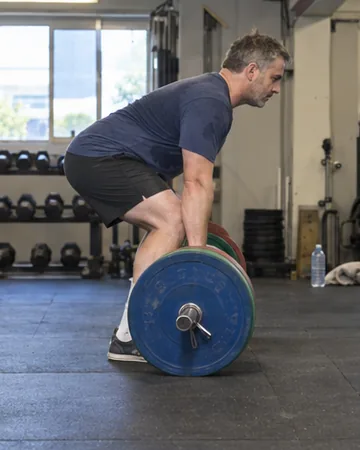 Bar over midfoot
-
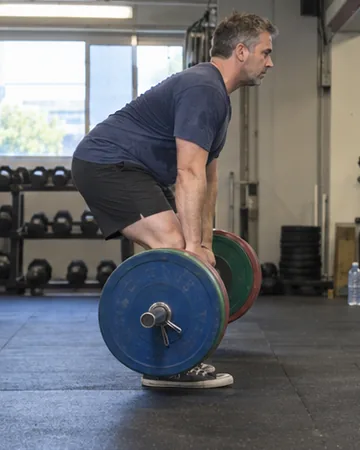 Build tension
-
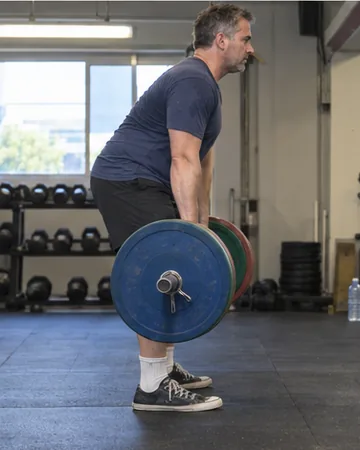 Push the floor away
-
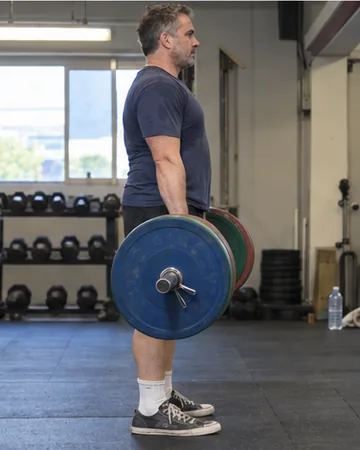 Stand tall
This guide covers the conventional barbell deadlift. Sumo and Romanian versions set up differently.
How to deadlift properly in five steps
Start light. A repeatable deadlift setup begins with the bar about mid-shin, its standard height. Full-diameter plates hold it there, including light bumper or training plates. If you only have small plates, raise the bar on blocks.
-
Stand with the bar over your midfoot
Your deadlift stance is narrower than a squat stance: heels 8 to 12 inches apart, toes turned slightly out. Look down: the bar should cross the middle of your whole foot, including the heel, with a small gap to your shins.
-
Grip the bar, then bring your shins to it
Push your hips back and grip just outside your shins, both palms facing you. Bend your knees until your shins touch the bar without rolling it forward. Keep your arms straight.
-
Brace and take the slack out
Fix your eyes on the floor 12 to 15 feet ahead. Take a breath, brace your abdomen, and keep pressure through your whole foot. Pull against the bar until you feel its weight, then lift. Avoid yanking from a loose setup. More on breathing and bracing →
-
Push the floor away and stand tall
Let your hips and shoulders rise together as the plates leave the floor. Keep the bar against or close to your legs. As it passes your knees, drive your hips forward to meet it. Finish with your hips and knees straight, without leaning back or shrugging.
-
Lower and reset
Push your hips back and slide the bar down your thighs. Bend your knees once it passes them, and lower under control. Let the plates settle, take your next breath, and rebuild your brace.
Do not squat the bar up. Starting with your hips low feels stronger, but they will rise to your real starting position before the bar moves. Let the setup decide your hip height. Your arm, leg, and torso lengths change how it looks.
Watch a deadlift demonstration
Watch the whole lift once, then practice the setup with a light load.
Want a slower setup walkthrough?
Skip to taking tension at 7:31 (opens in a new tab) or lowering at 10:55 (opens in a new tab).
How to check your deadlift form on video
Film a set from the side. Watch it once at normal speed, then compare your first and last reps at these four moments.
01 / READY
Did your setup move the bar?
Check whether bending your knees rolled it forward before the pull.
Fix bar drift →02 / LIFTOFF
What moves first?
Do your hips rise before the plates leave the floor, or does your position change afterward?
Fix early hip rise →03 / KNEE PASS
Does the bar drift forward?
Judge the bar path against your midfoot, not your shins. Your shins move too, so the gap alone can mislead you.
Fix bar drift →04 / FINISH
Do you finish standing tall?
Look for a backward lean at the top. Then watch where the bar lands: that is where your next rep starts.
Fix a backward lean →Your proportions will change how each position looks.
How should I film my set?
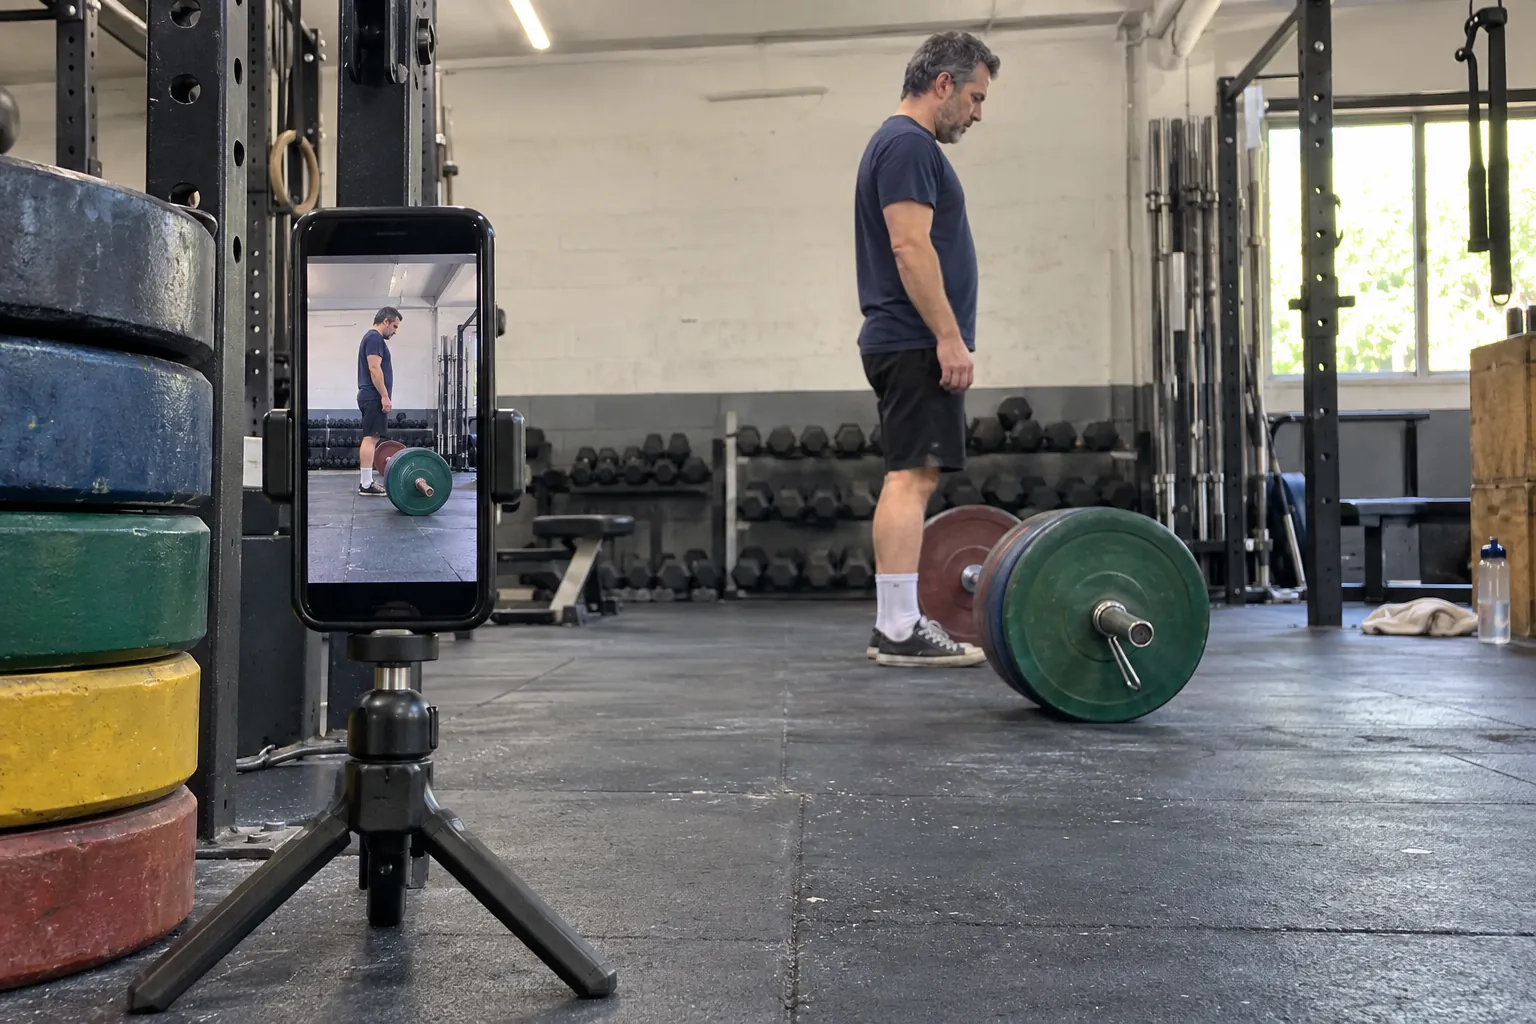
- Keep the phone steady, side-on, around hip height, outside the lifting area.
- Include your head, feet, plates, setup, and final return.
- Note the weight, reps, variation, and effort.
If a plate hides your knee or shin, add a slightly angled view. Keep camera positions consistent when comparing sets.
Want a second look? Upload your set for a free deadlift form check →
Common deadlift mistakes and how to fix them
Most deadlift mistakes start in the setup, so check what happens before the plates leave the floor first. Open the one you see in your video and test one fix.
Ready · Knee passThe bar drifts away from your legs
- Check
- Does it move while you set up, or after the plates leave the floor?
- Try
- If your knees push it forward, reset over midfoot and bring your shins to the bar without moving it. If it drifts during the pull, keep your arms long and think “Guide the bar up your legs.” Looking straight down can also let the bar swing out, so keep your eyes on the floor ahead.
- Recheck
- From the same side view, does the bar stay nearer its starting line? It should stay close without scraping your shins or pulling you backward. How bar path tracking works →
LiftoffYour hips shoot up before the bar moves
- Check
- Do your hips rise to the same position before every pull? Then you are starting lower than the position you actually lift from.
- Try
- Rebuild the setup, take the slack out, and lift without dipping your hips again. Think “Get tight, then push the floor away.”
- Recheck
- Does your ready position now match your liftoff position? Hips that rise before the bar moves point to the setup, not weak legs. If they rise after liftoff, try a lighter load and a more patient start.
LiftoffYour back rounds as the bar leaves the floor
- Check
- Compare your back in the ready position with the moment the plates leave the floor. A shape you set and hold differs from rounding that appears as the weight comes up. Loose clothing can hide both.
- Try
- Take the slack out fully before you lift, and be patient off the floor instead of jerking the bar. If your back still changes shape, reduce the weight until you can hold your setup position through the whole rep.
- Recheck
- From the same angle, does your back keep the shape you set? Video cannot diagnose an injury. If a rep causes pain, stop and get qualified advice.
FinishYou lean back at lockout
- Check
- At the finish, are you standing upright with your hips and knees straight? Or do you lean back or shrug to complete the rep?
- Try
- Start the lockout earlier. As the bar reaches your knees, squeeze your glutes and drive your hips forward to meet it. Think “Stand tall.”
- Recheck
- Does the rep end with the bar against your thighs and your body upright? Once your hips and knees are straight, the lift is done. Leaning back does not move the bar any higher.
Whole setLater reps look different
- Check
- Does the bar land farther forward? Do you rush the reset, or spend longer over it?
- Try
- Use the same setup routine on every rep: settle, grip, brace, pull. If control keeps slipping, finish the set and reduce the next set's load or reps.
- Recheck
- On which rep does the pattern return? Note any load change, too: an easier set can look better simply because it is easier.
Give your next set one job
Choose one pattern that repeats across reps. Test one change at a weight you control, filmed from the same position. If the pattern does not change after a couple of sets, try a different fix. If your reps already look consistent, keep lifting. You do not need to find a fault.
On rep three, the bar rolls forward during setup. Next set: bring my shins to it without moving it. Recheck rep three.
Deadlift form questions
Which deadlift grip should I use?
Start with both palms facing you, hands just outside your shins. A wider grip makes the bar travel farther. When the bar starts to slip on heavier sets, try a hook grip, which traps your thumb under your fingers, or a mixed grip, which turns one palm away. Straps are another training option. Learn any new grip with lighter loads and straight elbows. Competition rules may limit your choice.
How much should a beginner deadlift?
Start with a weight you can lift for five reps that all look the same. Add weight in small jumps while your setup and video stay consistent. In many gyms, 135 lb is the lightest load at standard height: a 45 lb bar with one 45 lb plate on each side, or 60 kg with 20 kg plates. For less, use light bumper plates or raise the bar on blocks.
What shoes should I wear to deadlift?
Flat, thin-soled shoes with no raised heel. They keep you close to the floor, so the bar travels a shorter distance. Wrestling shoes, deadlift slippers, and flat trainers all work. Avoid thick, cushioned running shoes: they raise you higher and give you a softer base to push from.
Is this the same as a Romanian or sumo deadlift?
No. These setup steps are for conventional deadlifts. A Romanian deadlift starts from standing; touching the floor is not its target. Sumo uses a much wider stance with your hands inside your legs. The video checks work for both, but your positions will look different.
Not sure what to change first?
Upload the side-view video you filmed. Your first deadlift form check is free: it gives you one change to make first and how to apply it on your next set.
Check my deadlift →No payment needed.