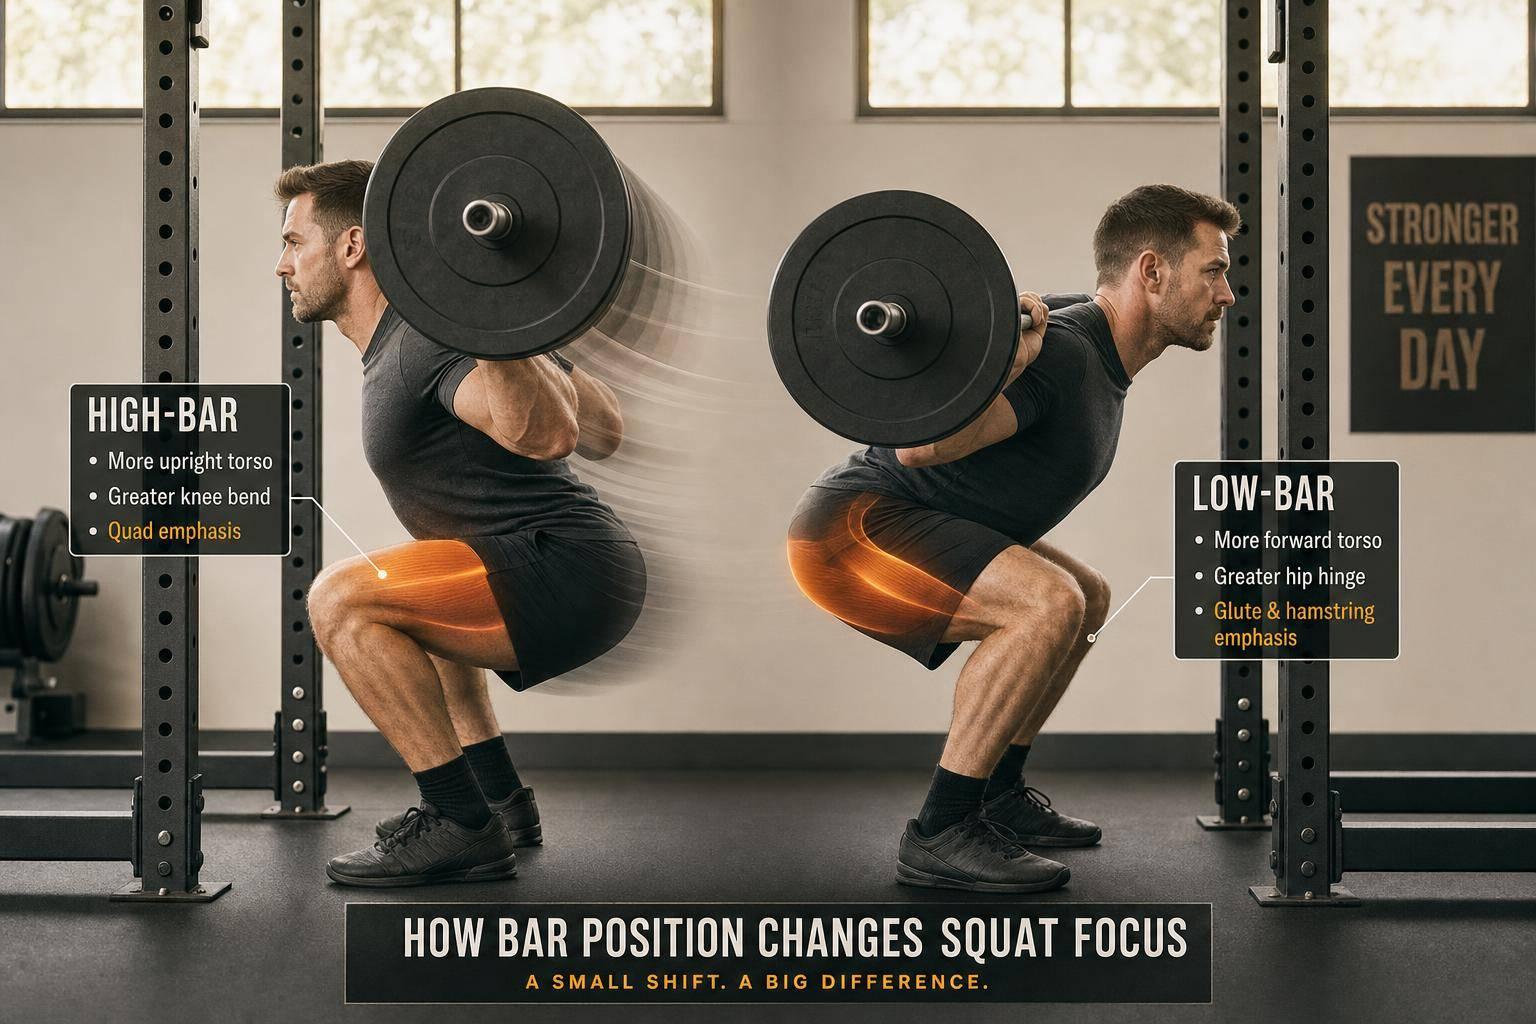
How Bar Position Changes Squat Focus
A bar moved just 2–3 inches can change your squat from more quad-heavy to more hip-heavy.
If I put the bar high on the traps, I usually get a more upright torso, more knee travel, and more quad work. If I put it lower on the rear delts, I usually lean forward more, use more hips and back, and can often lift 5–15% more load.
Here’s the short version:
- High bar = more upright torso, more quad bias, deeper squats for many lifters
- Low bar = more forward lean, more hip bias, more load for many lifters
- The bar still needs to stay over the mid-foot
- High bar often needs more ankle motion: about 38–42°
- Low bar often needs more shoulder motion and upper-back tightness
- A high-bar 1RM is often about 85–92% of a low-bar 1RM
- If my wrists, elbows, or shoulders hurt, setup is often the first thing I check
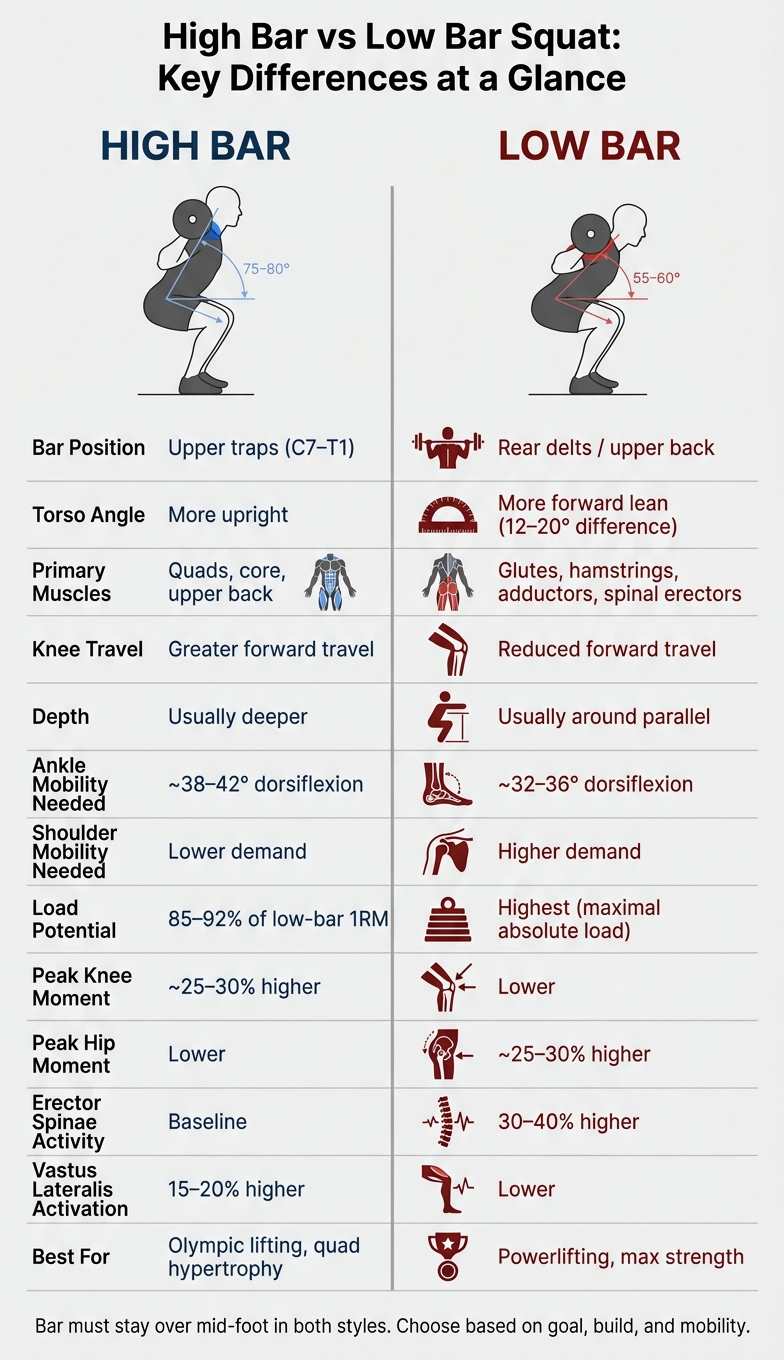
High Bar vs Low Bar Squat: Key Differences at a Glance
HIGH BAR VS LOW BAR SQUATS: WHAT’S THE DIFFERENCE?
Quick Comparison
| Point | High Bar | Low Bar |
|---|---|---|
| Bar position | Upper traps | Rear delts / upper back |
| Torso angle | More upright | More forward lean |
| Main muscle focus | Quads, core, upper back | Glutes, hamstrings, adductors, spinal erectors |
| Knee travel | More | Less |
| Hip demand | Less | More |
| Depth | Often easier to hit deep | Often around parallel |
| Load potential | Lower | Higher |
| Mobility demand | More ankle motion | More shoulder motion |
| Best fit | Olympic lifting, quad focus | Powerlifting, max strength |
If I want to pick the right squat style, I look at goal, build, and mobility first. Then I stick with one setup for 2–4 weeks and judge it by bar path, depth, and how my joints feel.
High-Bar vs Low-Bar Squat Mechanics Explained
High-bar and low-bar squats are separated by just a few inches of bar position. But that small change has a big effect on torso angle, leverage, and where the load is felt. In plain English: move the bar a little, and your body has to change shape to keep it lined up over the mid-foot.
Where the Bar Sits on the Upper Back
Both styles need a firm shelf of muscle on the upper back. In a high-bar squat, the bar rests on the upper traps, close to the base of the neck [3]. In a low-bar squat, the bar sits about 2–3 inches lower, across the rear delts and upper back [3].
Your hands help pin the bar in place, but they’re not meant to hold the weight. The upper back does that job. Proper setup is crucial, as it helps you avoid common squat form mistakes that can lead to instability.
Once the bar is set on a steady shelf, the torso has to adjust around it to stay balanced.
Why the Bar Must Stay Over the Mid-Foot
No matter which style you use, the bar still needs to stay over the mid-foot. That’s the key point. So when bar height changes, balance doesn’t change much, but body angle does.
With a high-bar squat, the torso stays more upright. With a low-bar squat, you need more forward lean to keep the bar stacked over the mid-foot [3]. Put differently, the lower bar position asks the torso to tip forward more so the system stays in line.
That shift in torso angle changes the squat from more knee-dominant to more hip-dominant. High bar puts more of the work on the quads and knees. Low bar moves more of it to the hips, glutes, hamstrings, and back [3].
So the tradeoff is pretty simple:
- High bar: more upright torso, more quad bias
- Low bar: more forward lean, more hip bias
How Bar Position Affects Torso Angle, Upper Back, and Depth
Upper-Back Shelf, Grip Width, and Torso Angle
The bar still needs to stay over the mid-foot. That part doesn’t change. What does change is the shelf you give the bar, and that shelf affects how much you have to lean.
With a high-bar squat, the bar sits on the upper traps. With a low-bar squat, it rests on the rear delts. Those are two different shelves, so they lead to two different body positions. A narrower grip tends to support the high-bar shelf, while low bar depends more on a hard upper-back squeeze to lock the bar in place.
That setup changes torso angle in a pretty direct way. High bar usually keeps you more upright. Low bar usually asks for more forward lean [3]. In fact, moving the bar lower can reduce the trunk angle by 12–20 degrees [3].
If your wrists or elbows hurt, that’s usually a red flag. In most cases, your hands are holding the bar up instead of just pinning it in place.
Depth Changes and Common Setup Problems
Torso angle also affects depth. When your torso stays more upright, your hips usually have more room to move, which is why high bar often makes full depth easier. Low bar tends to change that path. It often lines up with hitting parallel or just below, and many lifters use the stretch reflex closer to the bottom [1][3].
A few setup problems show up again and again:
- Bar rolling usually means the upper-back shelf is loose or the bar is sitting too high.
- Shoulder discomfort in low bar often points to limited shoulder mobility or a grip that’s too narrow.
- Wrist strain usually means the hands are carrying the bar.
- A collapsing chest usually means the upper back or brace gave out.
High Bar vs Low Bar Mechanics: Comparison Table
The table below shows the main mechanical differences at a glance.
| Feature | High Bar | Low Bar |
|---|---|---|
| Bar placement | Upper traps (C7–T1 level) | Rear delts / upper back |
| Torso angle | More upright [3] | More forward lean [3] |
| Knee travel | Greater forward travel | Reduced forward travel |
| Hip travel | Less hip hinge | More hip hinge |
| Typical depth | Usually deeper | Usually around parallel |
| Shoulder mobility needed | Lower | Higher |
| Load potential | Slightly lower | Highest |
How Bar Position Shifts Muscle Emphasis and Load
Bar position changes both which muscles take the brunt of the work and how much weight you can usually lift.
What High Bar Tends to Work
High-bar squats usually come with more knee bend and more forward knee travel. That puts the quadriceps front and center. Research shows high-bar squats can lead to 15–20% higher vastus lateralis activation than low-bar squats when relative load is matched [3].
High bar also asks more from the abs and upper back to keep the torso from folding forward. That’s a big reason it fits well with quad-focused training and Olympic lifting.
What Low Bar Tends to Work
Low-bar squats shift more of the job to the hips and back. As the torso leans farther forward, the hip moment arm gets longer. That pushes more demand onto the glutes, hamstrings, adductors, and spinal erectors.
When you account for both the heavier loads and the longer hip moment arm, the hip extensors may do about 17% more total work in the low-bar squat [1]. Erector spinae activity is also 30–40% higher than in matched high-bar conditions [3]. If your low back is already a weak point, that extra demand can matter a lot.
Most trained athletes can also squat 5–15% more weight with a low-bar setup. Put another way, a lifter’s high-bar 1RM often lands around 85–92% of their low-bar 1RM [3].
Here’s the side-by-side view.
Muscles, Load, and Tradeoffs: Comparison Table
| Feature | High-Bar Squat | Low-Bar Squat |
|---|---|---|
| Primary muscles | Quads, anterior core, upper back | Glutes, hamstrings, adductors, lumbar erectors |
| Peak knee moment | ~25–30% higher [3] | Lower |
| Peak hip moment | Lower | ~25–30% higher [3] |
| Load potential | 85–92% of low-bar 1RM [3] | Highest (maximal absolute load) |
| Ankle mobility demand | High (~38–42° dorsiflexion) [3] | Moderate (~32–36° dorsiflexion) [3] |
| Best use | Quad-focused hypertrophy, Olympic lifting | Powerlifting, maximal strength |
How to Choose the Right Bar Position for Your Goal and Build
Match Bar Position to Your Training Goal
Start with the mechanics, then pick the squat style that fits what you're trying to do.
Use high bar if your main goal is quad-focused hypertrophy or Olympic lifting. Use low bar for powerlifting and other max-strength work. Most lifters can move more load with low bar [4][1].
Adjust for Femur Length, Torso Length, and Mobility
If either style could work for your goal, let your build and mobility make the call.
Build comes first. Long femurs and limited mobility often push people toward low bar. Lifters with long femurs tend to lean forward more to keep the bar over the midfoot, which can sometimes lead to good morning squats if the hips rise too quickly, and low bar reduces the effective torso lever by about 2–3 inches [1].
Mobility is the next filter. High bar calls for about 38–42° of ankle dorsiflexion, while low bar needs about 32–36° [3]. So if your ankles are stiff, low bar will often feel more stable. Shoulder mobility also matters. Low bar needs enough shoulder external rotation and upper-back position to create a steady rear-delt shelf. If that setup gives you wrist, elbow, or shoulder pain, high bar is often the easier option.
Stick with one setup for 2–4 weeks before changing it [2]. If you switch back and forth all the time, it's hard to build a steady groove.
Setup Steps and Video-Based Form Checks
How to Set Up High Bar and Low Bar Step by Step
Once you pick high bar or low bar, stick to the same setup checklist each time. That’s how you make the position repeatable. The sequence stays the same for both styles. Only the bar position changes.
-
Set rack height
Set the bar around mid-chest height so you can unrack it without coming up onto your toes. -
Choose grip width and place the bar
For high bar, grip a bit outside shoulder width and rest the bar on top of the traps - below the base of the neck, not on it. For low bar, take a wider grip and place the bar across the rear delts, just below the shoulder blades, so your upper back makes a firm shelf. Your hands clamp the bar to your back; your upper back supports it. -
Brace and unrack
Take a deep breath, brace your trunk hard, and step back with the fewest steps needed to clear the rack. Then brace again before you descend.
Use Video Feedback to Refine Bar Placement
After a few sets, video can tell you a lot. It helps you see whether the bar stays on the right shelf or starts to drift as you descend.
Film from the side to check whether the bar moves forward of the mid-foot during the descent. Film from a rear 45-degree angle to see whether the bar is sitting securely on the shelf, whether your upper back stays tight, and whether your hips rise evenly out of the hole.
Keep your hand width, foot angle, unrack, and step-back the same across sessions for the same style. If you change those from set to set, it becomes hard to compare footage in any useful way.
If you want more specific feedback than you can get from watching the video on your own, CueForm AI can analyze uploaded squat footage and flag bar position, torso control, depth, and upper-back setup.
Conclusion: Pick the Bar Position That Fits Your Mechanics
After looking at mechanics, muscle focus, and setup demands, the choice comes down to your goal and your build. Bar position changes squat mechanics. A 2–3 inch shift changes leverage and load distribution, not just comfort.
Use high bar if you want more quad focus or if you're training for Olympic lifting. Use low bar if your main goal is max strength and a more hip-dominant squat. If both seem like solid options, let your build and mobility make the call.
Then stick with one position for a full training block. Judge it by a few clear signals: a repeatable bar path, steady depth, and joints that feel good under load. Those are the signs that the position fits your mechanics.
Once you've picked your bar position, video is the fastest way to check that it lines up with how you move. Use video to confirm bar path, torso control, depth, and balance over the mid-foot. CueForm AI can analyze squat footage and flag those points fast.
FAQs
How do I know if high bar or low bar fits me better?
Choose high bar if you want more quad focus, a more upright torso, or your ankle mobility lets your knees travel farther.
Choose low bar if your goal is to move the most weight, you’re fine with more forward lean, or you want more work from the posterior chain.
Go with the version that helps you hit depth on a regular basis, keep the bar over your midfoot, stay tight under load, and squat without joint pain.
Can I switch between high-bar and low-bar squats in the same program?
Yes, but treat them as separate skills.
Each bar position changes your torso angle, lever lengths, and which muscles do more of the work. That means the movement may look similar on the surface, but it won’t feel the same once you’re under the bar.
It’s often best to pick one for a training block and stay with it long enough to build consistency and dial in your technique. CueForm AI can help you track your form and catch breakdowns with either bar position.
What should I fix first if low-bar squats hurt my wrists or shoulders?
Start by making sure the bar sits on your upper back, not in your hands. If your wrists or shoulders hurt, there’s a good chance you’re bending your wrists to make up for limited shoulder mobility.
The fix is simple: build a solid shelf by pulling your shoulder blades together. You can also try a wider grip or a thumbless grip. If mobility is the issue, pec and lat stretches or band dislocates can help.