Barbell Back Squat
Created 7 months ago
Findings
Squat: control depth to avoid pelvic tuck
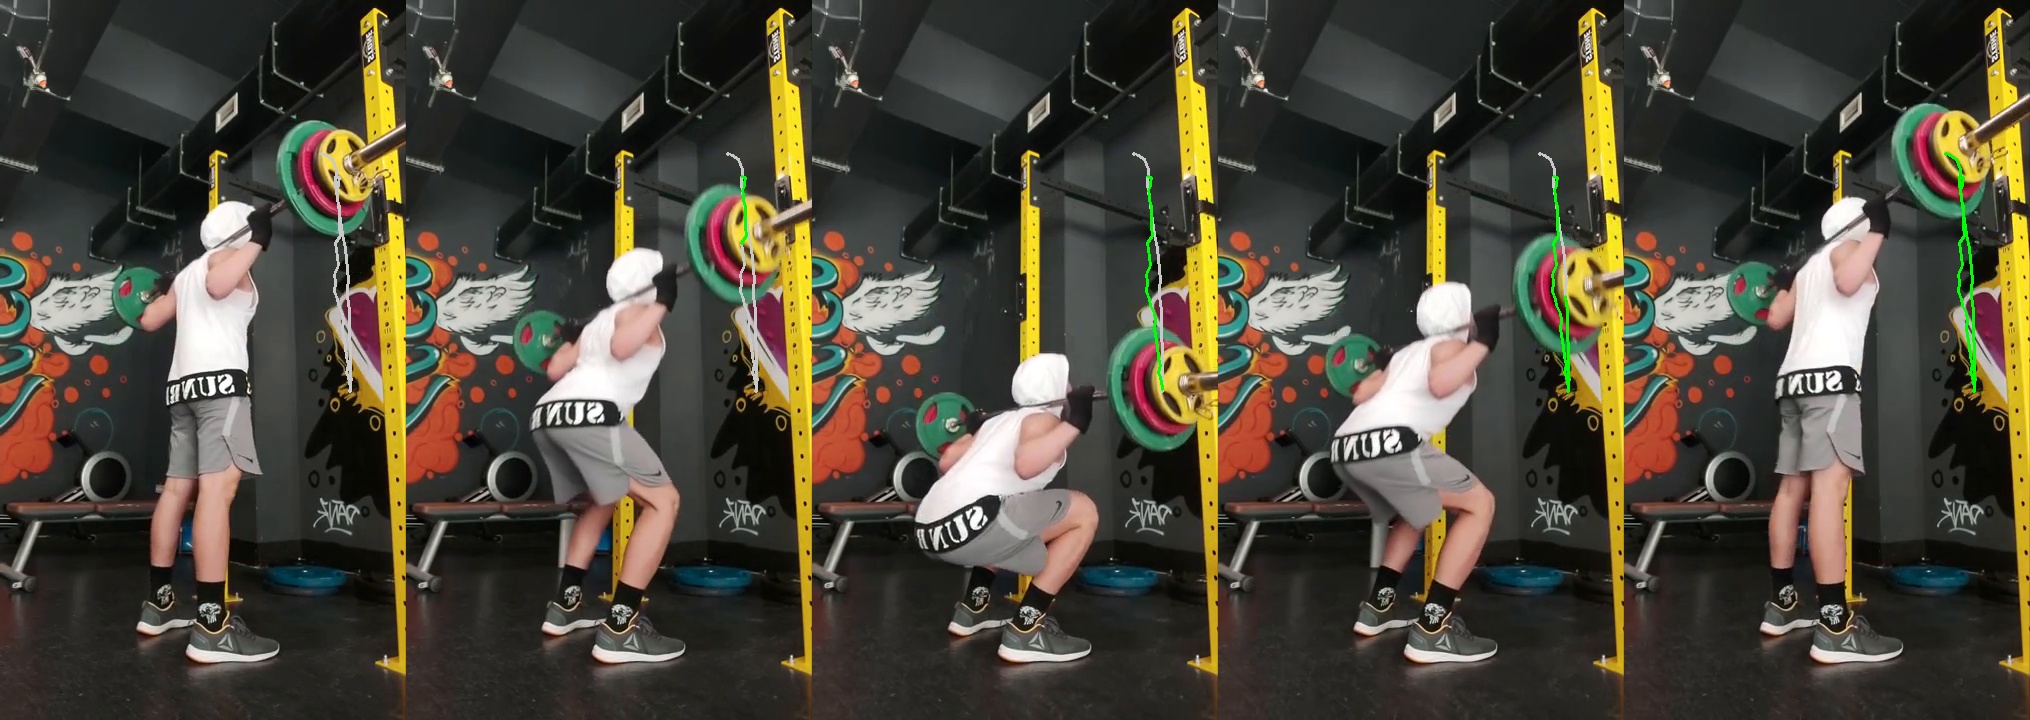
You’re moving the bar with good control and consistent depth for a moderate load. The main thing I see is slight to moderate “butt wink” at the bottom, which likely relates to the lower-back tension you feel afterward, so we’ll focus there. On each rep, control your descent and stop your hips just below parallel at the point where your pelvis is still neutral, rather than sinking deeper and letting it tuck under. A simple way to practice this is to do a few slower bodyweight or light warm‑up squats in front of a side view (mirror or video), and note exactly where the tuck begins, then use that as your new depth target. This keeps the work in your hips and legs instead of repeatedly loading the very end of your low-back range. With this adjustment and gradual load increases, that post‑session tightness should ease and your squat will feel stronger and more stable over time.
Detailed Report
1. Summary
Big picture
Your back squat looks controlled and consistent, with solid depth and a very clean bar path for all 5 reps. Main focus for the next 4 weeks: keep that good depth while reducing the amount of lower‑back “tuck” at the bottom and managing your post‑session low‑back tension.
Top 3 priorities (next 4 weeks)
- Dial in bottom position (reduce butt wink) – Less pelvic tuck at the bottom will make the lift feel stronger and may reduce stress on your lower back over time.
- Improve bracing and use a tiny pause at depth – Better bracing plus a brief controlled pause will help you stay stable in the hole instead of “falling” into your end range.
- Manage and monitor low‑back tension – Normal training soreness is fine, but we want to keep it in the “tight but okay” zone and avoid it turning into sharp or lingering pain.
2. What you’re doing well
Depth is consistently to or just below parallel.
Most reps are “slightly below parallel” with one rep clearly “below parallel.” That’s in line with common strength standards and should be acceptable in most powerlifting federations if you ever choose to compete (hip crease below the top of the knee). (studylib.net)Bar path is excellent.
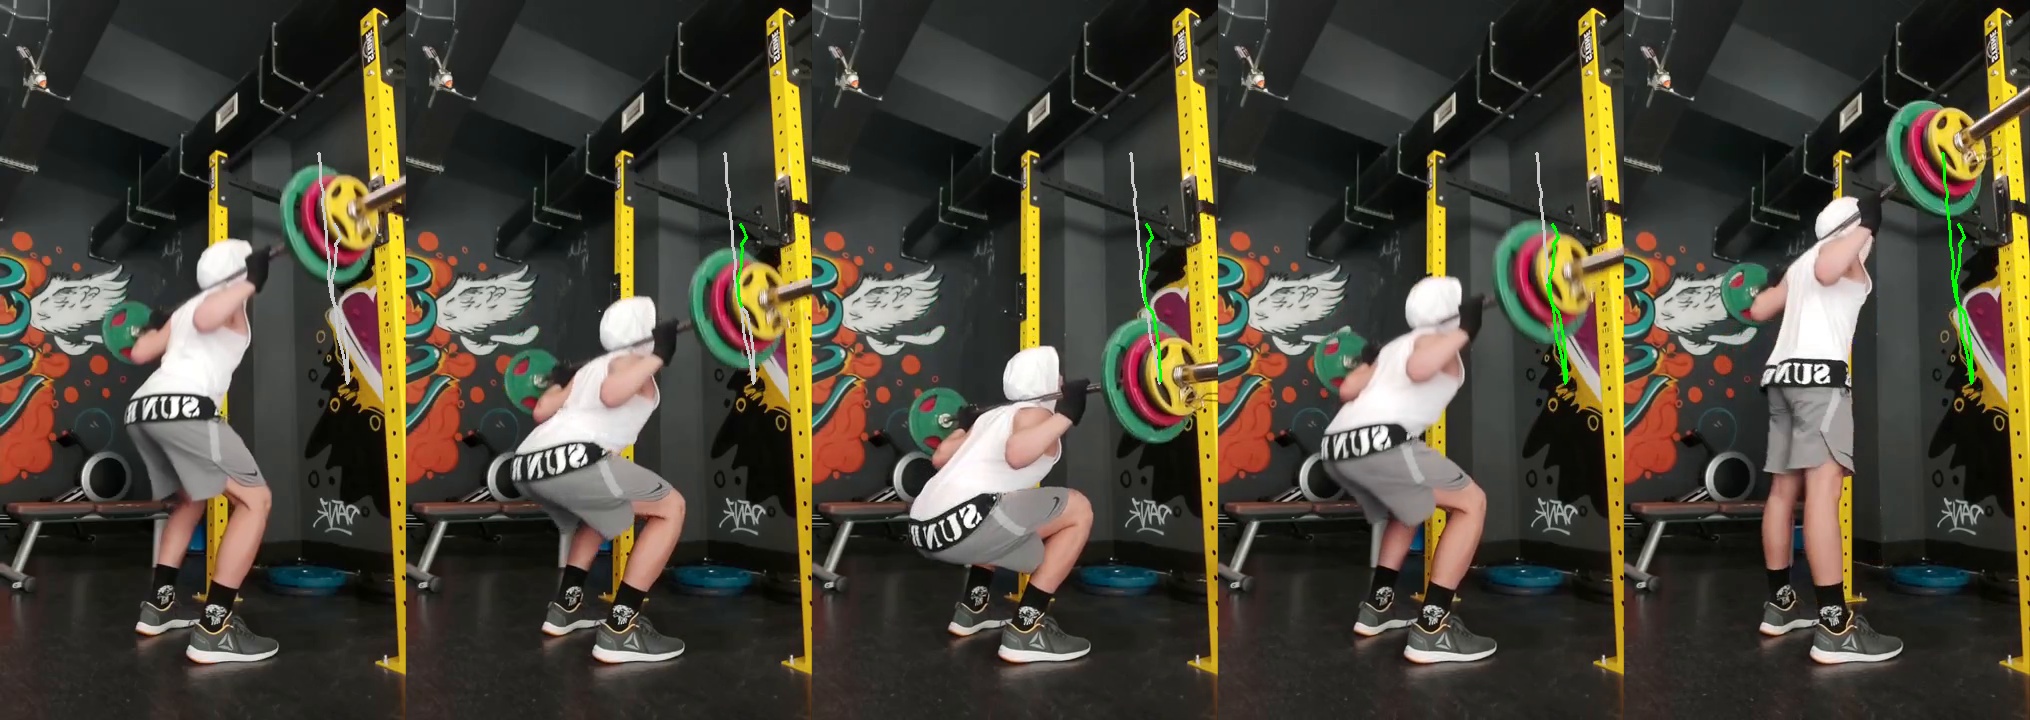
Descent and ascent are both categorized as “minimal deviation,” which means you’re keeping the bar close to over mid‑foot the whole time. That’s ideal for efficiency and keeping joint stress predictable. (pubmed.ncbi.nlm.nih.gov)Tempo is controlled, especially on the way down.
Your descent isn’t rushed and your concentric speed is smooth and consistent across reps. That controlled eccentric tends to reduce injury risk and improve strength gains compared with dropping into the hole. (pubmed.ncbi.nlm.nih.gov)Lockouts look clean and consistent.
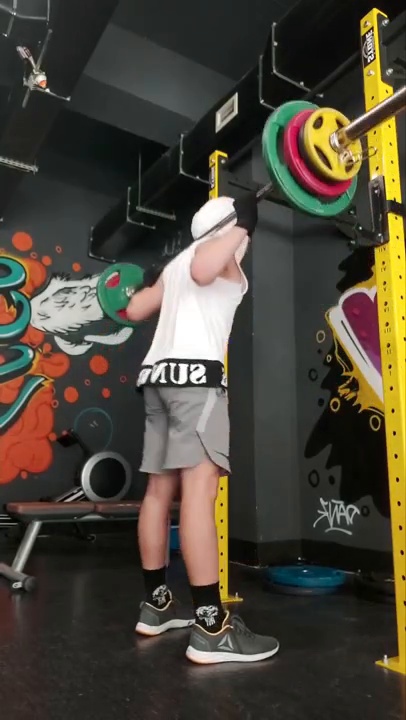
Each rep finishes with you upright and hips/knees extended, not cutting the last bit short, which is what we want both for performance and, if you ever compete, for passing judging standards. (studylib.net)
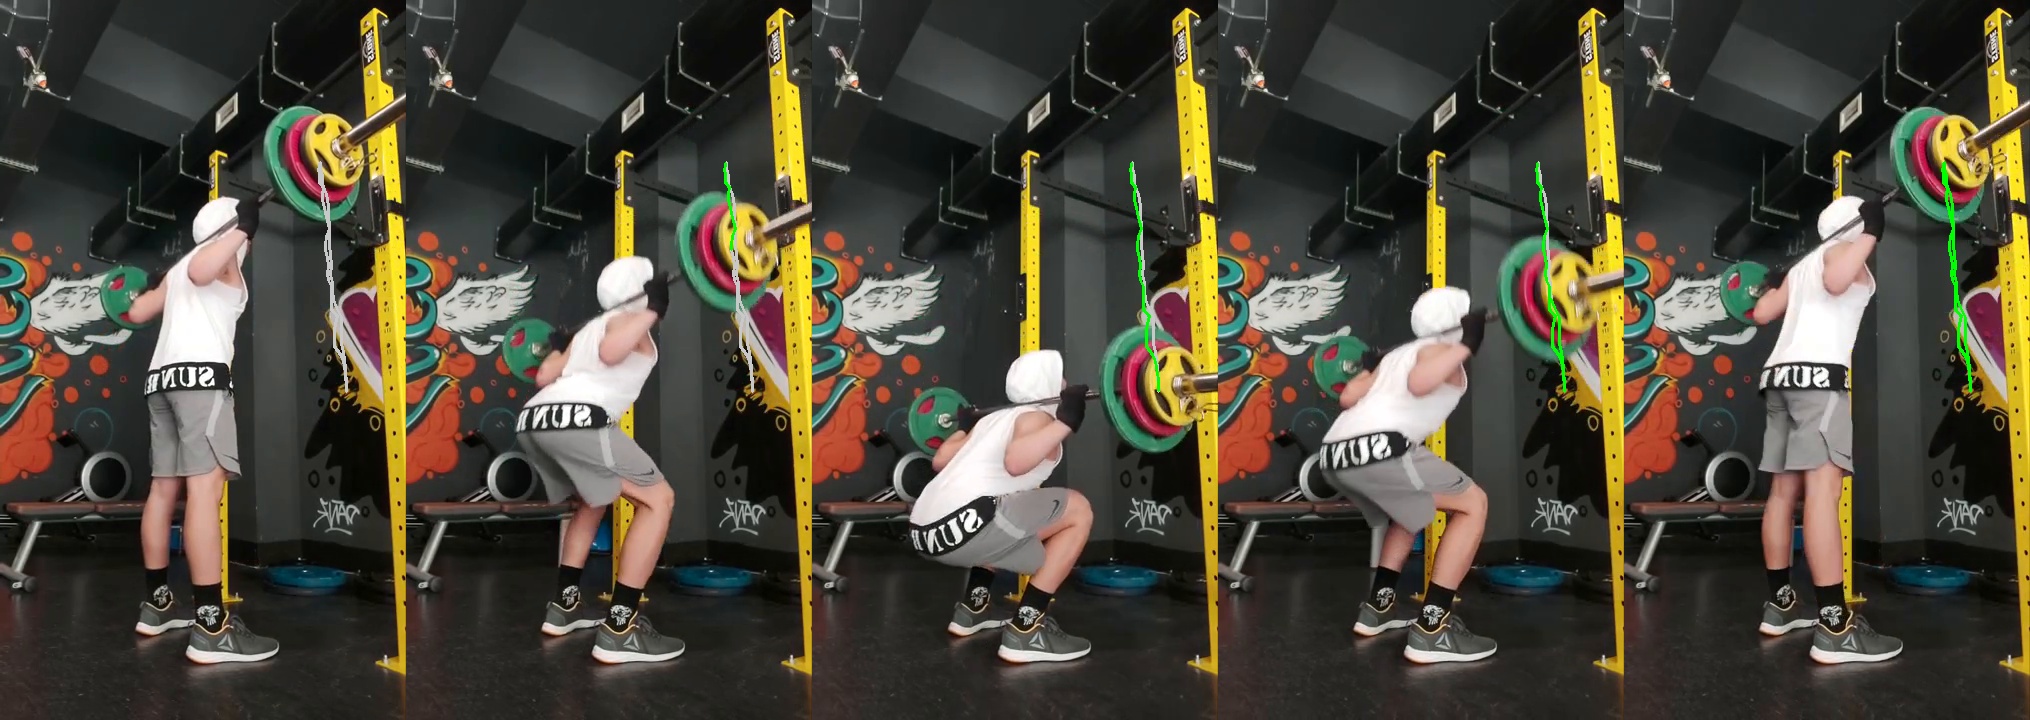
Here’s a nice “model” rep to emulate:
3. Key issues & cues (max 3)
Issue #1 – Butt wink at the bottom (pelvis tucking under)
- What we saw:
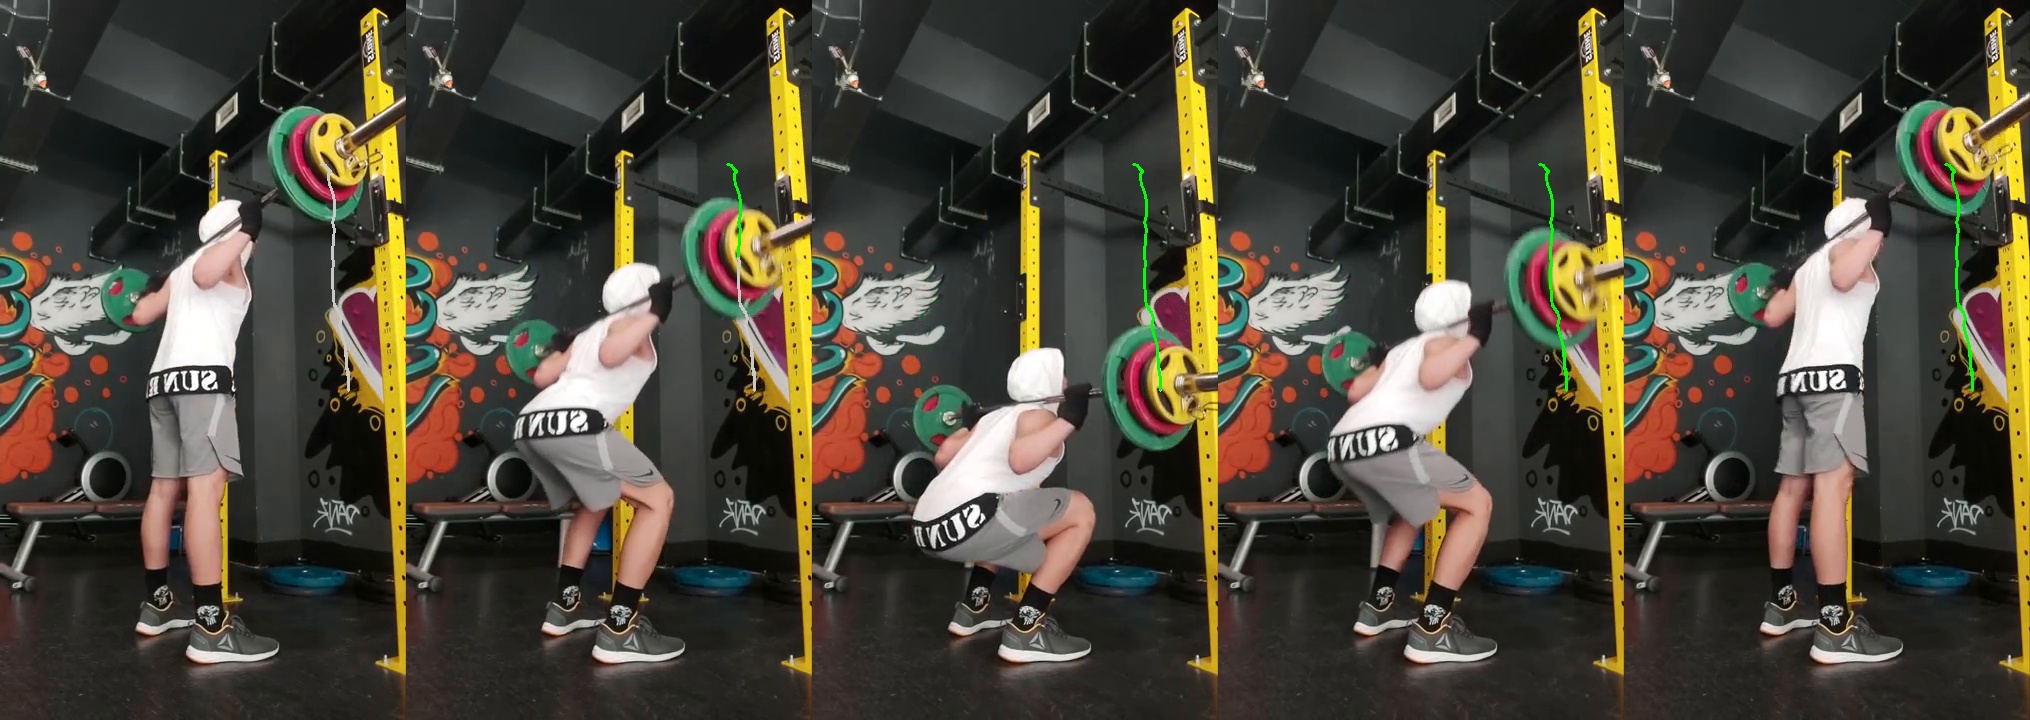
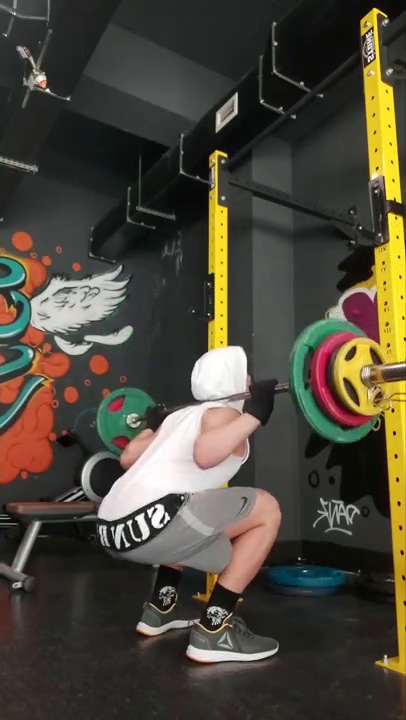
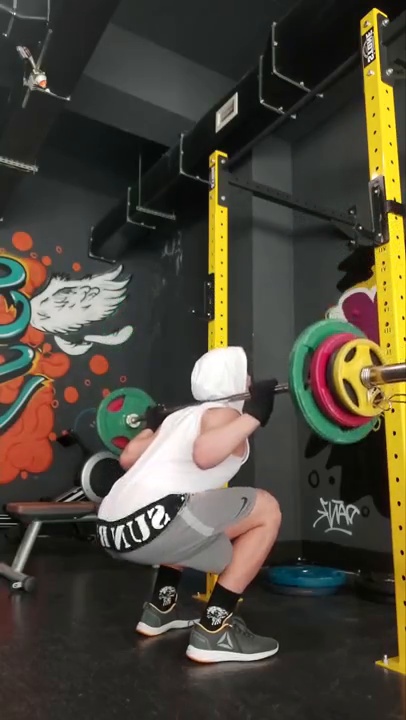
As you approach the bottom, your pelvis rolls slightly under (posterior pelvic tilt), especially on reps 2 and 4 (rated “moderate” butt wink). This goes along with the tightness you feel getting into the bottom position and the low‑back tension after the session.
At the bottom, focus on your pelvis and low back: you can see your hips slightly tuck underneath you and the lower back round a bit instead of staying more neutral.
- Why it matters:
This “butt wink” means the lumbar spine is moving into some flexion under load as you reach depth. Some sources argue that excessive lumbar flexion plus heavy loading could increase disc stress and reduce your ability to brace effectively. (verywellfit.com)
At the same time, recent research suggests that a small amount of spinal flexion during loaded movements isn’t clearly linked to higher injury risk by itself. (pmc.ncbi.nlm.nih.gov) So mild–moderate butt wink at a moderate load (like this set) is not automatically dangerous, especially if you don’t feel sharp pain. But if you push heavy loads and repeatedly go well into your end range with a big tuck, that’s where risk may creep up over time. - Primary cue for next session:
“Stop your squat just before your low back wants to tuck—own that depth.”
Practically: descend to the point where you start to feel your pelvis roll under, then think “hold your ribs down, show your chest to the wall in front of you, and push the floor away from mid‑foot” as you come up. - Supporting drills (1–2):
- Paused high‑tension squats @ ~60–70% of this load (50–55 kg), 3×4–5 reps, 2‑second pause just above your worst butt‑wink point.
Focus on: big breath + brace before you descend, pause where your back still feels neutral and solid, then drive up keeping your belt/torso pressure. - Goblet squats with counterbalance, 3×8–10 (light–moderate load).
Holding a kettlebell/dumbbell in front helps you stay more upright and explore a strong bottom position without as much load on your spine. Practice “knees forward, chest proud, hips between your ankles” while avoiding an obvious tuck.
- Paused high‑tension squats @ ~60–70% of this load (50–55 kg), 3×4–5 reps, 2‑second pause just above your worst butt‑wink point.
- If this causes pain:
If you notice sharp low‑back pain, pain that radiates into the glutes/legs, or pain that’s >3–4/10 and lasts more than a couple of days, pull back on depth and loading and get checked by a qualified medical/rehab professional (sports PT, sports‑minded physician).
Issue #2 – Bracing could be stronger / more intentional
- What we saw:
You descend under control, but from the rep‑timing and the slight low‑back rounding, it looks like you’re not setting a maximal brace before each rep. There’s almost no pause at the bottom (~no time spent stabilizing), so the brace has to “catch” you as you hit depth. - Why it matters:
A strong, repeatable brace (big breath into your torso, then “tightening around it”) increases spinal stiffness and lets your hips and knees do the work instead of your lower back. This not only supports performance but is a major part of low‑back injury prevention during squats and other heavy lifts. (pmc.ncbi.nlm.nih.gov) - Primary cue for next session:
“Big breath 360° around your belt, lock it, then ride that pressure all the way down and up.” - Supporting drills (1–2):
- Breathing + bracing practice with an unloaded bar or empty‑bar squats, 2–3 sets of 5 reps before working sets.
Before each rep: inhale through your nose into your belly and sides, grip the floor with your feet, then lock your torso like you’re about to be lightly punched in the stomach. - Tempo squats (3 seconds down, no bounce, normal up) @ ~60–65% of your working weight, 3×4–5.
The slower eccentric forces you to maintain that brace instead of relaxing into the hole.
- Breathing + bracing practice with an unloaded bar or empty‑bar squats, 2–3 sets of 5 reps before working sets.
Issue #3 – Post‑workout low‑back tension and “arched” feeling
- What we saw / what you reported:
You felt some tightness getting into the bottom position and then low‑back tension and a “slight arch” feeling after the workout. The set was RPE 7 (moderate) and bar speed stayed good, so this wasn’t maximal strain. - Is this normal or concerning?
- Mild, symmetrical “tight” or “worked” sensation in the low back after squats is very common—your spinal erectors and other trunk muscles are contributing a lot, and they can get sore just like quads or glutes.
- Current evidence suggests that lumbar flexion during lifting is not clearly associated with developing low‑back pain by itself. (pubmed.ncbi.nlm.nih.gov)
- Red flags would be: sharp pain, pain that spikes during the set and forces you to stop, pain that shoots down into the leg, or pain that is high intensity and persists for many days, disrupting sleep or normal life.
- Mild, symmetrical “tight” or “worked” sensation in the low back after squats is very common—your spinal erectors and other trunk muscles are contributing a lot, and they can get sore just like quads or glutes.
- What to do about it:
- Short term:
- Keep load around this level or slightly lighter while we refine technique (RPE 6–7 most of the time).
- Use a thorough warm‑up that includes some light back‑friendly movement (cat‑camel, bodyweight squats, hip hinges) and 2–3 ramp‑up sets with the bar/plates.
- After training, gentle walking and light mobility (e.g., child’s pose, 90/90 breathing) are fine if they feel good, but nothing needs to be “forced straight.”
- Medium term:
- Add low‑back and trunk strength work (e.g., back extensions, RDLs, side planks) 1–2x per week. Stronger trunk muscles often correlate with better tolerance to training loads. (pubmed.ncbi.nlm.nih.gov)
- Short term:
- If this escalates:
If the low‑back tension turns into sharp pain, if it radiates, or if you notice numbness/tingling or weakness, reduce load and volume immediately and see a qualified healthcare professional for an in‑person assessment.
4. Phase‑by‑phase breakdown
Setup
- What’s working:
- Bar seems to settle into a stable back position and the bar path data show you’re starting more or less over mid‑foot.
- You appear to have a consistent stance and hand position across reps—this repeatability is a big plus.
- What to tweak:
- Before each rep, take an intentional breath and brace. Right now it looks like you take a breath for the set rather than each rep. For most lifters, “one breath per rep” at moderate/heavy loads improves stability.
- You may benefit from thinking “ribs stacked over hips” before you descend (avoid aggressively arching your low back in the setup, which can contribute to that “arched” feeling later).

Descent / Eccentric
- What’s working:
- Descent tempo is controlled (roughly a little over 1 second most reps), which is great—you’re not crashing into the bottom.
- Bar path stays very straight with minimal drift forward or backward.
- What to tweak:
- As you pass the midpoint on the way down, think “sit between your hips” rather than letting your tail tuck under you. Small stance or toe‑angle changes (slightly wider/out) can sometimes give you more room in the hips; you can experiment with this over the next few sessions. (squatuniversity.com)
- Maintain tension in your quads and glutes—imagine lightly “spreading the floor” with your feet so you’re not just dropping into passive bottom range.
- As you pass the midpoint on the way down, think “sit between your hips” rather than letting your tail tuck under you. Small stance or toe‑angle changes (slightly wider/out) can sometimes give you more room in the hips; you can experiment with this over the next few sessions. (squatuniversity.com)
Bottom / Turnaround
- Depth / range of motion:
Depth is consistently just below parallel, one rep clearly deeper. That lines up with powerlifting standards (hip crease below top of knee) if your goal ever shifts that way. (studylib.net) - Position:
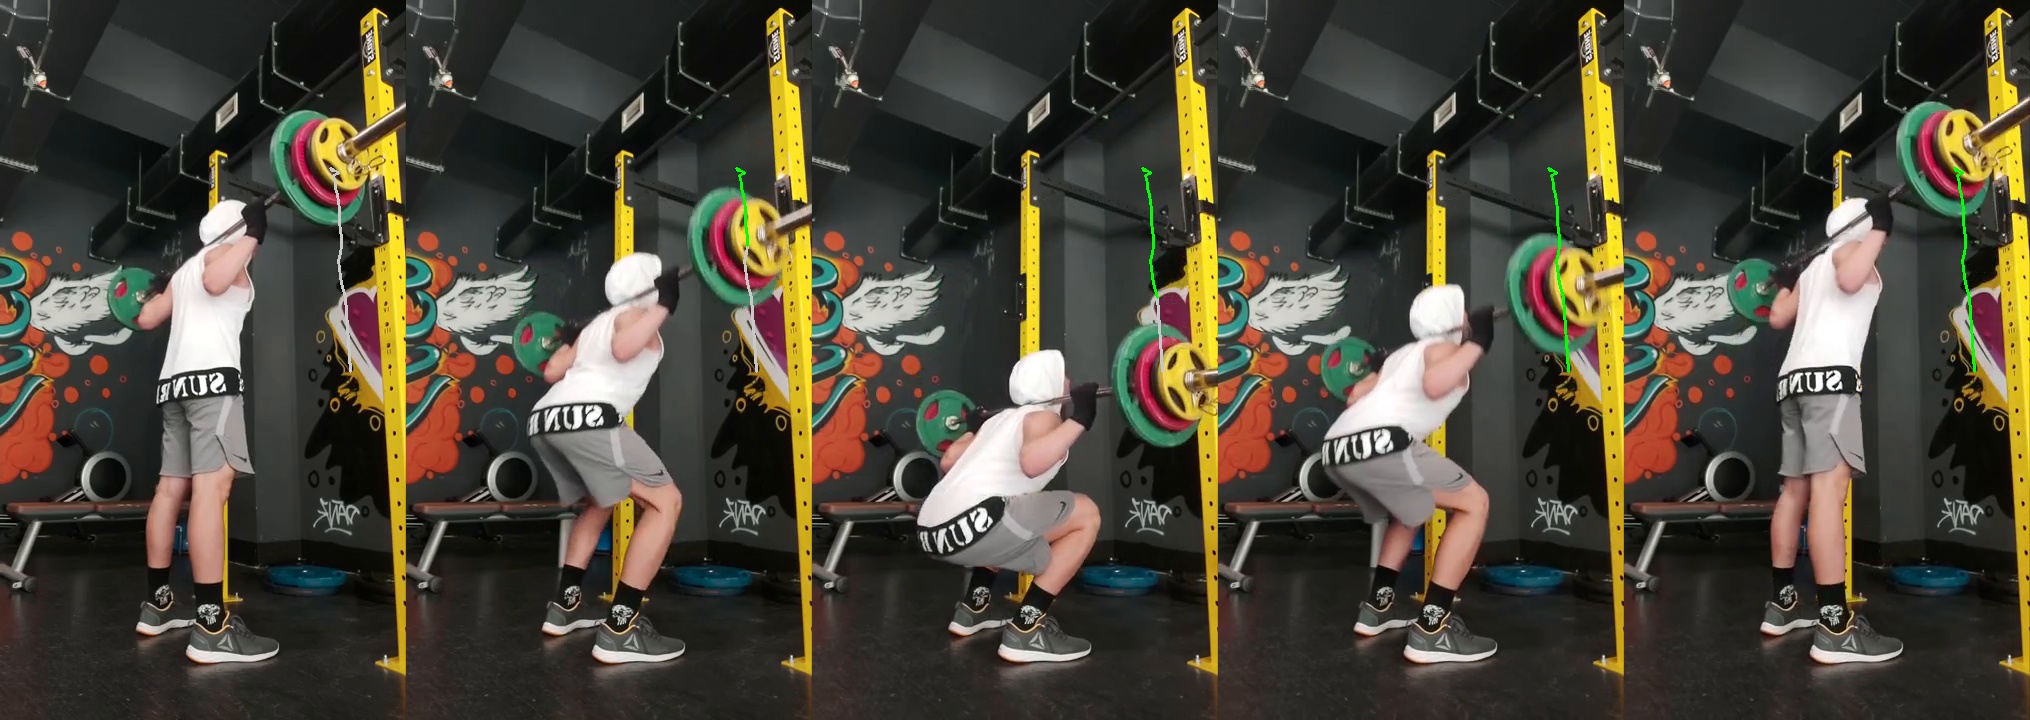
- Right near the bottom is where the pelvis tucks most, and the lumbar spine goes from neutral towards a bit of flexion.
- Knees appear to track reasonably well (no major cave reported by the system), and bar stays close to mid‑foot.
- Right near the bottom is where the pelvis tucks most, and the lumbar spine goes from neutral towards a bit of flexion.
- Speed & control:
- You do not pause at the bottom—the system shows essentially no bottom‑position time. You hit depth and immediately reverse direction. That’s fine for strength work, but for technique, adding a tiny 1–2 second pause will help you feel and control that end range.
Ascent / Concentric
- What’s working:
- Bar rises smoothly with no obvious sticking or major form breakdown at heavier fatigue.
- Bar path again is very straight—minimal forward/back drift.
- What to tweak:
- Drive out of the bottom by thinking “push the floor away from mid‑foot and stand up with your chest” instead of allowing your hips to lead too much. Even though there’s no big hip‑shoot, that mental cue reinforces using hips and quads together rather than loading the low back.
Lockout / Finish
- Notes:
- You reach full hip and knee extension consistently and keep the bar under control at the top.
- No re‑bending of knees or collapsing at the top—this is exactly what we want in a finished rep and would satisfy competition criteria for a completed squat. (studylib.net)
Rep cadence & consistency
- Rep times are quite consistent after rep 1 (which is a bit faster on the way down). This suggests you have a good sense of rhythm and control.
- Keep aiming for same tempo each rep—especially on technical days. If you feel yourself speeding up or “dive‑bombing” when tired, that’s your sign to either reduce the load a bit or cut the set.
Load suitability
- At 80 kg and RPE 7 with controlled speed and only mild form drift, the load looks appropriate.
- For the next 4 weeks while you focus on technique and back comfort, I’d keep most squat work around RPE 6–7 (you could clearly do 3–4 more reps in the tank) and only occasionally push heavier.
5. Goal alignment & programming notes
- Your current technique is already very solid for a general strength goal: consistent depth, stable bar path, and a moderate RPE with clean reps.
- The main refinements—reducing butt wink and improving bracing—are “foundational” work that will:
- Make heavier loads feel safer and more stable later.
- Likely reduce the annoying low‑back tightness you noticed.
- Over the next 4 weeks, we’ll treat this as a technical consolidation phase: slightly sub‑maximal loading, lots of high‑quality reps, and a few targeted accessories to build trunk/hip control.
- This will set you up to push heavier loads later with more confidence and less “Is my back okay?” chatter in your head.
6. 4‑week practice plan
Here’s a simple structure you can blend into your current training. Adjust exact days to your schedule (e.g., 2 squat days/week).
| Week | Focus | Example session cue / drill |
|---|---|---|
| 1–2 | Groove depth just before butt wink; brace | Main squats: 3×5 @ ~65–70% of your usual working weight (around 55–60 kg), 2–3 min rest. Before each rep: 1 big breath + brace, descend under control, pause 1–2s just above where your low back wants to tuck, then drive up. |
| Accessory: 3×8–10 goblet squats (light‑moderate), focusing on “hips between ankles” and no pelvic tuck; 2–3 sets of side planks or dead bugs for trunk control. | ||
| 3–4 | Integrate improved bottom position into heavier work | Main squats: 1 top set of 4–5 reps @ RPE ~7 (similar to this 80 kg feeling), then 2–3 back‑off sets of 4–5 @ ~90% of that load, keeping the same pause and bracing cues. |
| Accessory: Tempo squats (3s down, no pause, normal up) 2–3×4 @ ~60–65% of your working weight; back extensions or hip hinges (RDLs) 2–3×8 for low‑back and hip strength, RPE 6–7. |
Filming note:
Once per week, film one squat set from a side or slightly rear‑diagonal angle at around hip height, so we can clearly see back position and the pelvis at the bottom.
Re‑upload prompt:
Re‑upload a back‑squat video at a similar RPE and load in 2–4 weeks so we can see how these cues are landing and adjust your plan.
7. Progress checkpoints
Film setup for next check:
- Camera about knee–hip height, 2–3 m to the side or slightly rear‑diagonal.
- Capture full body and bar, including feet and hips.
Targets to observe:
- From the side, hip crease is just below the top of the knee at depth—no extra sinking into a rounded low‑back position.
- Pelvis: only mild or no visible butt wink as you hit the bottom.
- Bar path: stays roughly over mid‑foot on the way down and up (no big forward drift).
- Torso: keeps its angle without suddenly collapsing more horizontal out of the hole.
- Low‑back feeling: post‑session tension is mild and settles within 24–48 hours.
Session targets:
- Keep most technique work in the RPE 6–7 range. If a set feels like RPE 8–9, treat it as a heavier top set and reduce back‑off weight.
- If you feel your brace or depth quality slipping—especially if butt wink increases—end the set or reduce weight.
If not met:
- If your pelvis still tucks markedly by rep 3–4 at a given load, drop 5–10% off the bar and repeat the set focusing on your cues (brace, pause just before the tuck).
- If low‑back tension after squats is escalating (more intense each week, or lasting longer), take 1 deload week (reduce load ~20–30% and/or cut volume in half) and consult a medical professional if symptoms persist or worsen.
8. References
- Hartmann, H., et al. “Analysis of the load on the knee joint and vertebral column with changes in squatting depth and weight load.” Journal of Strength and Conditioning Research, 2013. – Reviews how squat depth and load affect spinal and knee stresses. (pubmed.ncbi.nlm.nih.gov)
- International Powerlifting Federation. Technical Rules Book, 2023–2025 Editions. – Defines squat depth standards (top of hip below top of knee) and completion criteria. (studylib.net)
- Borrelli, R., et al. “Thoracolumbar and Lumbopelvic Spinal Alignment During the Barbell Back Squat.” Sports Health / PMC, 2023. – Examines spinal posture changes during back squats and discusses neutral vs flexed positions. (pmc.ncbi.nlm.nih.gov)
- Saraceni, N., et al. “To Flex or Not to Flex? Is There a Relationship Between Lumbar Spine Flexion During Lifting and Low Back Pain? A Systematic Review with Meta‑analysis.” Journal of Orthopaedic & Sports Physical Therapy, 2020. – Finds limited evidence that lumbar spine flexion during lifting is a major risk factor for low‑back pain. (pubmed.ncbi.nlm.nih.gov)
- Munro, A., et al. “Posterior Pelvic Tilt During the Squat: A Biomechanical Perspective and Possible Solution with Short‑Term Exercise Intervention.” Applied Sciences, 2025. – Discusses “butt wink” mechanics and shows that targeted interventions can reduce excessive posterior pelvic tilt. (mdpi.com)
If you have any follow‑up details (height, training age, goals like “eventual meet” vs “general strength”), I can tune this even more precisely to you.
Video
Athlete Context
Weight
80.0 kg
RPE
7.0
Focus
Wants guidance on whether post-workout lower-back tension is normal/should be a concern and how to get used to it or prevent it.
Pain
Yes Tightness when getting to the bottom position; after the workout had lower-back tension and a slight arch (intensity not provided).
What weight was on the bar for this set?
80 kg
How hard did this set feel? (Use RPE 1-10 or RIR or ‘easy / moderate / hard’)
RPE 7, it was moderate.
Did you feel any pain, discomfort, or movement restrictions? If yes, where and how intense (0-10)?
I felt some tightness getting to the bottom position. After the workout, I felt some tension and slight arch in my lower back.
What came immediately before this video? (brief warm-up, prior sets/exercises, rest interval)
Just some warm up.
Any other details that you want to let the coach know?
Let me know if the lower back tension post workout is normal and if I should be concerned. Anything that I can do to get used to it or prevent it or it'll just go away with time?
Plans
Choose the plan that best fits your needs.
Free
Try it out
Starter
Perfect for fitness enthusiasts