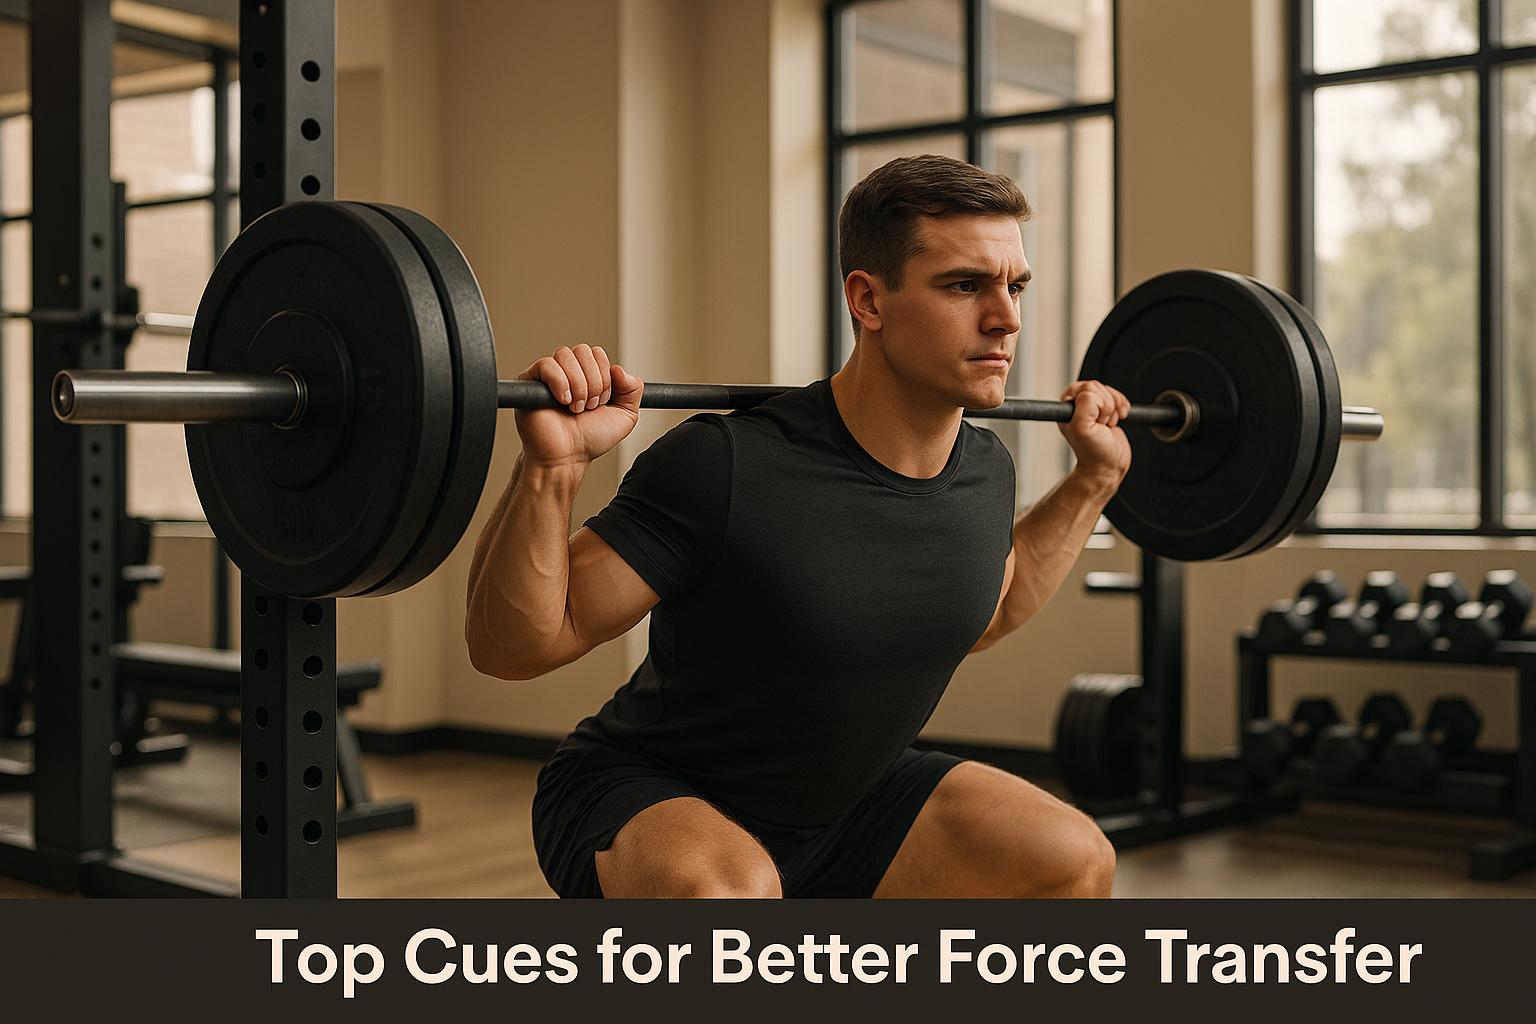
Top Cues for Better Force Transfer
Force transfer is the foundation of effective compound lifts like squats, deadlifts, and bench presses. It ensures power flows efficiently through your body, reducing energy loss and injury risk. To improve your lifts, focus on these key cues:
- Root Your Feet: Create a stable base by "screwing" your feet into the ground.
- Push the Floor Away: Shift focus to driving through your legs for better power.
- Break the Bar: Engage your lats and upper back by visualizing pulling the bar apart.
- Hinge at Your Hips: Use your hips to maintain a neutral spine and activate your posterior chain.
- Squeeze Glutes at Lockout: Ensure proper hip extension by contracting your glutes at the top.
- Brace Your Core: Build spinal stability by tightening your core muscles.
- Pack Your Shoulders: Secure your shoulder blades for better upper-body stability.
- Lead With Your Chest: Maintain posture by keeping your chest elevated.
- Drive Elbows Under the Bar: Align your elbows to improve joint stability and force transfer.
- Eyes Forward or Neutral: Direct your gaze to maintain balance and alignment.
Each cue addresses specific mechanics, helping you lift heavier, safer, and more efficiently. Start with 2–3 cues per lift and refine as you progress. Tools like CueForm AI can provide real-time feedback to fine-tune your form and ensure consistent improvement.
6 Best Weightlifting Cues for Beginners
External vs. Internal Cues: What Works Better
Understanding the difference between external and internal cues can make a big difference in optimizing how force flows through the body during movement. Internal cues focus on what’s happening inside the body, like muscle activation (think: "tighten your thigh muscles and push through your legs to stand up"). On the other hand, external cues shift the focus to the outcome of the movement (for example, "imagine pushing the floor away from you") [2].
Interestingly, research leans heavily toward external cues as being more effective, especially for multi-joint exercises. The constrained action hypothesis explains why: external cues allow for automatic motor control, leading to smoother and more efficient movements. Internal cues, however, can disrupt this natural flow by introducing conscious effort into the process [5]. A meta-analysis of over 100 studies backs this up, showing that external focus improves motor performance and learning across all ages, health conditions, and skill levels [5]. Plus, external cues have been linked to better balance, stronger neuromuscular force expression, and quicker changes in direction [4]. It’s clear that focusing on the movement outcome can enhance force transfer and overall performance.
Another advantage of external cues is that they minimize unnecessary muscle co-contraction and reduce activity in opposing muscles, allowing the body to work more efficiently as a whole [5]. Despite this, many coaches still rely on internal cues. For instance, one study found that 84% of track and field athletes reported being coached with instructions focused on specific body parts. Even in elite Dutch league baseball, pitchers received external cues only 31% of the time [1].
That said, internal cues do have their place. They’re particularly helpful for beginners learning the basics or for seasoned athletes who need to fine-tune their technique [3]. As Elite Track Coach Dan Pfaff puts it:
"Most successful coaches are the ones that know when to use one over the other, and how to tread that line." [1]
1. Screw Your Feet Into the Floor
This technique focuses on creating external hip rotation and a stable base - heel, ball, and toes - helping to maximize force transfer during lifts.
How It Improves Force Transfer
This approach works wonders because it naturally activates multiple muscle groups through something called neurological patterning. Strength coach Chad Aichs explains:
"Just by simply rooting your feet to the floor you will find almost all the muscles of your lower body, especially your posterior chain, will automatically flex. Proper rooting of the feet triggers neurological patterns in the body to fire the correct muscle groups." [6]
The key lies in forming a tripod foot position - ensuring contact through your heel, the ball of your foot, and your toes. This position creates a solid foundation that channels power upward effectively. As Steve Freides puts it:
"The firmer your push, the less power dissipates and the stronger you become." [7]
This activation strategy isn’t limited to one type of lift; it adapts well across various multi-joint exercises.
Why It Works for Multi-Joint Exercises
This cue is especially effective in lifts like the sumo deadlift, where the screwing motion activates the posterior chain by engaging the glutes and hamstrings while externally rotating the hips. But its benefits extend to squats, presses, and more.
The feet, loaded with nerve endings, play a crucial role in balance and proprioception under heavy loads. By gripping the floor with your feet, you’re not just stabilizing yourself - you’re also signaling your glutes to contract harder, enhancing performance across different movements.
Now, let’s dive into how to execute this cue correctly.
Simple and Easy to Execute
One of the best parts of this technique is its simplicity. By focusing on rooting your feet, you can streamline your form and improve overall coordination. Chad Aichs highlights this benefit:
"If the lifter is rooting properly, their knees will be in the right position and they will stay tight. So instead of them thinking about many different things, they can just think about rooting hard with their feet. One simple action cleans up their focus and makes coaching easier." [6]
To execute this properly, spread your toes to increase contact with the ground. Pull the ball of your foot back toward your heel while pushing the heel outward, maintaining full-foot contact. Most of your weight should rest on your heels, but don’t lose contact with the rest of your foot.
Solving Common Lifting Problems
Unstable feet, weak posterior chain engagement, and poor coordination between the legs, hips, and lower back are common challenges for lifters. This cue addresses all of these issues by promoting a stable and engaged lower body. However, it’s important to avoid twisting at the knee joint instead of externally rotating at the hip.
The goal is to feel the contraction in your hips rather than just moving your feet. Kelly Starrett recommends keeping your toes at a slight angle - about 7–11 degrees - while screwing into the ground [8]. If your toes or the balls of your feet lift during the movement, you’re losing that essential rooted connection.
To make this technique second nature, practice rooting your feet not just during workouts but throughout your day. The more ingrained this pattern becomes, the better your force transfer will be when lifting heavy.
2. Push the Floor Away
Once you've established a strong base by rooting your feet, the next step is to engage your legs by actively "pushing the floor away." This simple yet powerful cue shifts your focus from pulling the bar to extending your knees, ensuring the bar stays aligned over your mid-foot.
How It Improves Force Transfer
Building on the foundation of foot rooting, this cue enhances lower-body activation and control. By emphasizing knee extension, it prevents premature hip movement and keeps the bar path vertical - critical for efficient lifting.
Strength coach Mark Rippetoe explains the mechanics behind this approach:
"The best cue for this movement is 'Push the floor away from the bar.' You actually push the middle of your foot down into the floor, like a leg press, but where the hips move up instead of the foot plate. This extends the knees and pulls them out of the way as the bar rides up the shins." [9]
Versatility Across Compound Lifts
While particularly useful for deadlifts, this cue carries over to other multi-joint exercises. In deadlifts, focusing on pushing the floor away helps engage your quadriceps early in the lift, reducing strain on your lower back and making the movement more efficient.
For squats, the concept can be adapted by gripping the floor with your feet, activating your glutes, and "spreading the floor" with your legs. This creates tension and stability throughout the lift, helping you maintain proper form and control.
Whether you're performing conventional or sumo deadlifts, this cue is especially valuable during warm-up sets or lighter training days, as it reinforces correct movement patterns and builds muscle memory.
Intuitive and Easy to Apply
One of the reasons this cue is so effective is its simplicity. The idea of pushing through your mid-foot, much like pressing on a footplate during a leg press, is easy for most lifters to grasp. To execute, focus on driving your mid-foot into the ground while maintaining balance.
Barbell Logic highlights the importance of this cue for knee extension:
"To cue 'push the floor away' or 'leg press the floor away' emphasizes the necessary knee extension to most efficiently begin the deadlift strong off the floor." [10]
Experiment with phrasing like "push the ground away" to find what feels natural and resonates during your lifts.
Solving Common Lifting Challenges
This cue also addresses frequent lifting issues like knee instability and balance problems. Dr. Aaron Horschig, a physical therapist and strength coach, points out:
"I find that a majority of nagging aches and pains athletes deal with aren't due to deficits in strength, but instead the ability to turn on appropriate muscles at the right time (aka coordination)." [11]
By focusing on this single action - pushing the floor away - you simplify your movement, improve coordination, and reduce errors like jerking the bar or extending your hips too early. This cue ensures a controlled, smooth start to your lift, which directly supports better force transfer.
To get the most out of this approach, practice creating tension by hinging down before pulling. Incorporate paused deadlifts just below the knee during warm-ups, and record your lifts to identify and correct issues like knee collapse or hip sway. These adjustments, paired with the "push the floor away" cue, can help you refine your technique and lift more effectively.
3. Break the Bar
The "break the bar" cue is a powerful technique for improving force transfer during compound lifts. By visualizing the act of pulling the bar apart, you engage your lats and upper back, creating tension that enhances stability and control. This tension helps smooth the transition between the eccentric (lowering) and concentric (pressing) phases of a lift, allowing for more efficient force transfer[12]. Additionally, this cue ensures proper alignment of the lats and scapula, which promotes consistent body positioning. With improved lat engagement, your shoulders remain tight, and your elbows naturally shift into a more effective position. Think of it like switching from shooting from an unstable surface to firing from a rock-solid platform - the better your foundation, the more power you can generate. This technique builds on earlier methods by emphasizing the upper body's critical role in stabilizing and transferring force.
Applicability to Multi-Joint Exercises
Although this cue is most commonly associated with the bench press, it works well across a variety of compound lifts. Armi Legge, VP of Content Marketing at Legion, explains:
"One of the best bench pressing cues is 'break the bar in half,' one of the best cues for squatting is 'spread the floor with your feet,' and one of the best cues for deadlifting is 'crush oranges in your armpits.'" [13]
For bench press variations, the "break the bar" cue helps maintain upper-body tension and keeps the shoulder blades retracted and stable. Similarly, in squats, focusing on grip tension and lat engagement supports a solid transfer of force throughout the movement. This consistency across different lifts highlights the versatility of the cue and its effectiveness in reinforcing proper engagement patterns.
Ease of Understanding and Execution
What makes the "break the bar" cue so effective is its simplicity. Instead of getting bogged down by overanalyzing your form, you can focus on using your back muscles to create the desired tension. Start by gripping the bar firmly and squeezing it as hard as possible, imagining that you're bending the bar in half. Keep your wrists neutral and concentrate on widening the bar with your back muscles. When done correctly, you’ll feel your lats activate and your elbows naturally tuck closer to your body.
Relevance to Common Lifting Challenges
This cue addresses several common lifting problems, including shoulder instability, poor grip engagement, and elbow flaring. Many lifters struggle with maintaining a stable bar path or achieving adequate lat tension during pressing movements. By squeezing the bar as though pulling it apart, you create a stable upper-body setup that encourages proper elbow positioning and improves overall form and performance[14].
However, it’s important to avoid overdoing it. If your elbows start tucking too close to your sides, you may need to adjust your approach. Try experimenting with alternative mental cues like "pull the bar apart", "lock in the lats", or "point your thumbs away from your face" until you find the balance that complements your lifting style. These adjustments can help you fine-tune the technique to suit your needs.
4. Hinge at Your Hips
Mastering the hip hinge is a game-changer for multi-joint exercises. When you hinge at your hips, you bend forward from the hip joint while keeping your spine neutral. This movement activates your posterior chain - your glutes, hamstrings, and lower back - which are crucial for generating power and staying stable.
Peloton Instructor Jermaine Johnson puts it simply:
"Hinging at the hips means bending forward from the hip joint while maintaining a neutral spine" [19].
By shifting the workload from your back to your stronger leg muscles, you not only improve efficiency but also lower your risk of injury. This technique is the backbone of effective force transfer in compound lifts.
Boosting Power Through Proper Technique
A well-executed hip hinge creates a direct pathway for force, making your lifts both stronger and more efficient. Research indicates that proper hip hinging not only enhances strength but also reduces joint pain [17]. Strengthening your glutes and hamstrings through this movement is one of the best ways to alleviate lower back discomfort and improve stability [17]. The key to generating power lies in driving your hips back [20].
Why It’s Essential for Multi-Joint Exercises
Hip hinging is critical for integrating leg power into your lifts. In squats, it helps maintain a neutral spine and allows for a wider, more natural range of motion [19]. For Romanian deadlifts, it ensures your chest and back stay flat while keeping your hips high throughout the movement [17]. Beyond the gym, mastering the hip hinge can even help you lift objects safely in everyday life [17].
How to Perform the Hip Hinge
Executing a hip hinge is simpler than it seems. Start by standing with your feet shoulder-width apart, shifting your weight to your heels. Keep your chest open and your back flat as you push your hips backward and tilt your torso forward [19]. A helpful mental trick is to imagine sitting into a chair behind you - this naturally guides your hips back while keeping your spine aligned. If you’re new to this movement, practicing with a dowel along your spine can help. Aim to maintain three points of contact: your head, the area between your shoulders, and your glutes [15].
Addressing Common Mistakes
Like rooting your feet or pushing through the floor, a proper hip hinge channels force effectively from your hips upward. Common errors include rounding the back, overusing the lower back instead of the hips, and failing to engage the core [18]. To avoid these pitfalls, focus on driving your hips back with a slight bend in your knees. This ensures your glutes and hamstrings are doing the work while your core remains engaged. Studies show that incorporating the hip hinge can reduce pain, improve hamstring flexibility, correct pelvic tilt, and enhance balance in individuals with tight hamstrings [21].
As Joslynn Peterson explains:
"When you bend forward from the hips (while maintaining a neutral spine), you're able to engage your glutes and hamstrings, while minimizing stress on your low back" [16].
Consistency in your hip hinge technique lays the groundwork for better force transfer and stronger, safer lifts across the board.
5. Squeeze Your Glutes at Lockout
When you reach the lockout phase in movements like squats and deadlifts, activating your glutes is a game-changer. By squeezing your glutes at the top, you ensure proper force transfer while protecting your spine from unnecessary strain. This step ensures your strongest muscles take over to finish the lift effectively.
As strength coach Kavinay Kishor puts it:
"Squeezing the glutes drives the hips forward and completes lockout" [22].
In short, engaging your glutes at lockout not only maximizes power but also reduces the risk of relying too much on your lower back, which can lead to discomfort or injury.
Why It Boosts Force Transfer
Glute activation at lockout plays a critical role in amplifying power. The gluteus maximus, the largest muscle in your body, is specifically built for hip extension and makes up 16% of your total cross-sectional muscle area [26]. Activating it at the right moment ensures you’re applying maximum force where it matters most.
Research backs this up. One study found that participants who practiced daily glute-squeezing exercises saw a 16% increase in glute strength over eight weeks. By comparison, participants performing glute bridges only improved by 5% [24]. This shows that focused glute engagement at lockout directly targets the muscles responsible for hip extension, enhancing overall performance [22]. This technique easily translates across a variety of compound lifts.
How It Works Across Different Exercises
This cue is especially valuable in multi-joint movements like deadlifts, where squeezing your glutes helps drive your hips forward for full extension without overloading your spine. It’s also a key technique for Romanian deadlifts and hip thrusts, where glute engagement stabilizes the pelvis and ensures proper force transfer. As the weights get heavier, maintaining this stability becomes essential to prevent form breakdown and safeguard against injury [22].
Dr. Bryan J. Lahecka highlights the importance of glute strength:
"Gluteal power, endurance and strength are the cornerstones to performance" [24].
Whether you’re locking out a deadlift or finishing a squat, glute activation ensures your form stays solid and your power output remains consistent.
Simple Yet Effective Execution
What makes this cue so effective is its simplicity. At the top of your lift, consciously contract your glutes while keeping a neutral spine. Avoid overextending your back, which can lead to poor alignment. Think of it as a controlled contraction rather than an exaggerated squeeze. A helpful mental trick is to imagine tucking your tailbone slightly between your legs, creating a gentle posterior pelvic tilt [24].
Personal trainer Pennie Varvarides explains:
"It can sometimes be useful to squeeze your glutes at the top of a deadlift. That's where the muscles will be more loaded and so it's important to move through the full range of motion and 'finish' the move... But you still don't want to be pushing your hips through or overextending the spine, so don't overinterpret that advice" [23].
The goal is balance - engage your glutes fully, but don’t overdo it. Controlled movement ensures safety and optimal performance.
Addressing Common Lifting Problems
Glute engagement at lockout can help resolve common lifting issues, such as incomplete lockouts or uneven force distribution. Many lifters struggle with lower back pain or inconsistent power during heavy lifts. Proper glute activation stabilizes the pelvis and reduces strain on the lower back [25].
However, there are pitfalls to watch out for. Over-squeezing can lead to problems like valgus knee movement or medial knee pain [28]. The focus should be on driving hip extension through the glutes without hyperextending the lower back [27].
Varvarides offers a helpful reminder:
"A squat should finish with your ribs stacked over your hips. Focusing too much on squeezing your glutes can create a pelvic tuck that pushes your hips too far forwards" [23].
The key is to maintain proper alignment - stand tall with your ribs over your hips while engaging your glutes. This approach ensures optimal force transfer and keeps your form intact.
6. Brace Your Core
Bracing your core is all about creating a stable foundation that allows force to travel efficiently through your body. Spine expert Dr. Stuart McGill calls this proximal stiffness, which strengthens the connection between your lower and upper body, helping you perform better. But core bracing isn’t just about tensing your abs - it’s a full-circle effort. You need to engage your abs, obliques, transverse abdominis, erector spinae, and even your pelvic floor muscles to build stability around your spine. This stability plays a critical role in boosting your power output, as research has shown.
How Core Bracing Improves Force Transfer
When lifting heavy, core bracing is key to transferring force effectively. Studies indicate that isometric trunk flexion endurance is closely tied to maximal relative deadlift strength [29]. By generating intra-abdominal pressure, your core creates a rigid, stable cylinder that prevents energy from leaking out. Dr. Stuart McGill explains:
"Core stiffness produces more force and torque (a force that causes rotation) on the leg side of your hip while stopping unwanted spine bending in the proximal (pelvis and spine) side of your hip." [31]
Without proper bracing, some of the force you generate can be lost as your spine bends or extends under load. But when your core is tight, every ounce of effort is directed into the lift, making your movements more efficient and powerful.
Why It’s Essential for Multi-Joint Exercises
Core bracing is especially important in compound movements like squats, deadlifts, and overhead presses. These exercises put significant stress on your spine, and a braced core helps stabilize your trunk to resist unwanted movement in any direction - forward, backward, or sideways [29]. For example, during squats, bracing prevents your torso from collapsing under a heavy barbell. In deadlifts, it keeps your spine from rounding. And for overhead presses, a tight core stabilizes your entire body, helping you lift heavier weights safely. Whether you’re working on bodyweight moves or chasing a new personal best, core bracing becomes even more critical as the weight increases.
How to Practice Core Bracing
Learning to brace your core starts with proper breathing. Take a deep breath, directing the air into your belly instead of your chest. Hold that breath and tighten your entire midsection, as if bracing for a punch [30]. Practicing in front of a mirror can help you see if you’re engaging the right muscles. Aim to expand your torso evenly instead of just pulling your stomach in [32]. Begin with simple bodyweight exercises like planks and push-ups to get the hang of it, then progress to weighted movements. Once you’ve mastered the technique, apply it to daily tasks like lifting heavy objects or standing for extended periods.
Solving Common Lifting Problems
A well-braced core can help you tackle common lifting challenges, such as lower back strain and poor form during heavy lifts. Weak or disengaged core muscles leave your spine vulnerable to injury during demanding compound exercises [30]. Keeping your core tight throughout the entire movement helps maintain a neutral spine, reducing the risk of injury and boosting your power output. Plus, consistent bracing improves posture and functional strength, benefiting not just your gym performance but also your everyday life.
sbb-itb-c91a623
7. Pack Your Shoulders
Shoulder packing is all about stabilizing your shoulder blades to create a strong base for heavy lifts. This isn’t just about pulling your shoulders back; it’s about setting them into a position that supports proper mechanics during compound movements.
How It Improves Force Transfer
When you pack your shoulders, you center the humeral head in the glenoid fossa. Dr. John Rusin explains this as the "screw home mechanism", stating, "Packing the shoulder is the most centered position of the head of the humerus in the glenoid fossa" [33]. This alignment doesn’t just protect your joints - it also activates stabilizing muscles that improve how force moves through your body during lifts.
Why It Matters for Multi-Joint Exercises
Scapular stability is a game-changer for compound lifts like the bench press, overhead press, and deadlift. For example, in the bench press, the bench limits your scapula’s natural movement. To compensate, you need to actively pull your shoulder blades down and back to create a solid base. Overhead movements require a balance between stability and mobility, ensuring the scapulae stay dynamic yet controlled throughout the lift. Essentially, shoulder packing builds on other techniques by reinforcing upper-body stability - a must for safe and effective multi-joint lifts.
Simple Steps to Execute
To pack your shoulders, imagine pulling your shoulder blades together and driving them down toward your tailbone. Think of creating a sturdy "shelf" with your upper back. For a bench press setup, focus on engaging your lats to lock your shoulder blades into place. As Master RKC Matt Beecroft warns:
"Many haphazardly overused cues in the fitness industry also expose a poor understanding of functional anatomy and nuance. Without that understanding, we could be creating some long-term negative effects with incorrect cuing" [34].
Addressing Common Lifting Problems
Shoulder packing can help fix issues like protracted shoulders or forward head posture - problems that often plague desk workers. By positioning your shoulder blades correctly, you reduce the risk of injuries to your shoulders and pecs while improving force transfer efficiency. Just like bracing your core stabilizes your torso, packing your shoulders secures your upper body, making every lift smoother and safer.
8. Lead With the Chest
In weightlifting, focusing on cues like "leading with the chest" plays a crucial role in stabilizing your upper body for efficient force transfer. By keeping your chest elevated during lifts, you encourage proper spinal alignment, which not only improves your lifting mechanics but also helps distribute force more effectively.
How It Improves Force Transfer
Leading with the chest creates a stable foundation for transferring force. JAG Physical Therapy explains it well:
"Good lifting posture ensures that the intended muscle groups are fully worked and that the mass is distributed evenly, not awkwardly, uncomfortably, or dangerously. The basis of this proper posture is aligning your upper and lower body around the centerline – your head and spine. Your back should remain straight while your chest stays forward, with your shoulders backward but not shrugged" [36].
This alignment minimizes energy loss caused by unnecessary compensatory movements. By channeling force along the most direct path, you can lift heavier loads with greater control and efficiency. This approach is especially beneficial for compound exercises that demand coordination across multiple joints.
Why It Works for Multi-Joint Movements
The "lead with the chest" cue shines in exercises like squats and bench presses. In squats, keeping your chest up prevents the weight from shifting forward, which helps you maintain balance and control throughout the movement. For the bench press, this cue ensures your upper back stays engaged, providing a solid base for pressing.
Even powerlifting legend Ed Coan emphasized the importance of this cue, particularly for maintaining an upright chest position during the descent in squats [37].
Simple and Easy to Apply
One of the best things about this cue is how straightforward it is. Most lifters can easily visualize the idea of keeping their chest forward. For squats, think about opening your hips while keeping your chest elevated. In overhead presses, imagine two walls guiding the bar straight up, which helps avoid over-arching your back [38].
Solving Common Lifting Issues
Leading with the chest is also a great way to address common postural problems. It counteracts the forward-pulling effect of tight front-body muscles and promotes activation of the upper and middle back [35]. This is especially helpful for desk workers who often deal with slouched shoulders and forward head posture. Adopting this cue can serve as a corrective strategy to improve overall posture and lifting form.
That said, not every lifter responds to the same cues. Strength coach Tate Tobiason highlights this flexibility:
"Every athlete is different and will respond to different cues. A coach can't keep yelling 'CHEST UP!' for the fourth week in a row if their athlete is not responding to it and their chest keeps collapsing as their hips shoot back. At this point, it may be time to explore different cueing options, such as 'drive with your quads'" [37].
The key is finding a variation of this cue that aligns with your unique movement patterns, ensuring you get the most out of your lifts.
9. Drive Elbows Under the Bar
Positioning your elbows under the bar is a key technique for improving force transfer during pressing movements. When done correctly, this adjustment aligns your joints in a way that optimizes mechanics. Instead of relying solely on muscle strength, this alignment allows force to travel more efficiently through your skeletal structure, making your lifts both stronger and more stable [45].
Why It Works for Force Transfer
When you drive your elbows under the bar, your forearms naturally become vertical, creating a sturdy foundation. This alignment channels force through your skeleton, reducing joint stress and increasing the power transfer from your legs and core to the barbell [41].
As strength coach Ben Pollack explains:
"Your torso angle tends to follow your arm position, so when you have your elbows pointed back, perpendicular to the floor, your torso is likely to end up in a similar position. Pushing the elbows down helps to stay upright, keeping the hips closer to the bar and allowing the hips and legs to contribute more to finishing the lift" [43].
This mechanical advantage is particularly valuable across various compound lifts, though its application can differ depending on the movement.
Adapting the Cue for Different Lifts
The "elbows under the bar" cue is versatile, benefiting exercises like overhead presses and squats, but its execution varies slightly for each.
- Overhead Pressing: Starting with your elbows forward of the bar ensures a smooth and efficient lift [40]. Keeping the elbows angled inward allows your shoulders, upper chest, and triceps to work in harmony [41].
- Squats: Driving the elbows down and under helps maintain an upright torso, which is crucial for engaging the hips and legs effectively. Ben Pollack shared how this adjustment transformed his squat technique over a decade. By reducing his forward lean and focusing on elbow positioning, he improved his form and moved past a plateau in the 500-pound range [43].
Easy to Learn and Apply
Most lifters can quickly grasp how to position their elbows under the bar. The key is to establish this positioning before unracking the bar [42]. From a side view, your elbows should sit slightly in front of the bar, creating vertical forearms that stabilize the movement.
For overhead presses, practice keeping the elbows tucked into the body during the setup and initial lift. Close-grip overhead presses are particularly useful for reinforcing this technique, as they naturally encourage proper elbow alignment under the wrists [41]. This setup enhances the kinetic chain, ensuring efficient power transfer from your legs and core.
Solving Common Lifting Mistakes
This cue tackles several frequent errors in lifting technique. One major issue is elbow flaring, which disrupts joint alignment and reduces force transfer. On the flip side, over-tucking the elbows during a bench press can limit the involvement of your chest muscles [44]. The goal is to find a balanced position where your elbows stay directly under the bar - not too far in or out. A helpful trick is the "flare and push" method: touch the bar as usual, but adjust your elbows so they stay aligned under the bar [44].
Another problem this cue addresses is "elbow drop", which shifts the bar away from your shoulders. Dr. Jonathon Sullivan explains:
"Instead of allowing the hip thrust to drive the shoulders forward under the bar, the elbow drop pulls the bar away from the shoulder (not to mention that it pulls the bar down, which as you may be aware is the opposite of the direction we want it to go)" [39].
10. Eyes Forward or Neutral
Just like anchoring your feet and engaging your core, where you direct your gaze plays a key role in efficient force transfer. Your line of sight not only influences your balance and posture but also impacts how effectively your body generates and transfers power. A small tweak in where you focus your eyes can improve your lifting mechanics and help you handle heavier loads more safely.
How Vision Affects Force Transfer
Your vision is central to maintaining balance and spatial awareness [46]. A steady gaze helps stabilize your posture, ensuring better force transfer throughout your body. Your eyes guide your head and, in turn, your entire body. Research backs this up: a 2006 study by Donnelly, Berg, and Fiske revealed that looking down during squats caused increased hip and trunk flexion, which disrupted the smooth transfer of force from the legs through the core to the barbell [48]. Similarly, studies on one-leg standing exercises showed that tracking moving objects with your eyes led to less stability and higher muscle activity compared to maintaining a fixed gaze [47]. This highlights how crucial your gaze is for efficient movement during lifts.
Applying This Cue to Compound Lifts
The "eyes forward or neutral" cue works across a variety of multi-joint exercises to enhance posture and balance. Where you focus your eyes has a direct impact on your lifting efficiency [49].
The goal is to pick a focal point that promotes proper spinal alignment. For pressing movements, keep your eyes fixed straight ahead at eye or forehead level. Looking down can create unnecessary strain on your body by introducing inefficient moment arms, while looking too far up might cause you to lean back, throwing off your lockout position [49].
Simple and Effective
This cue is easy to understand and apply. Most lifters can quickly adopt it by choosing their focal point before unracking the bar and maintaining that focus throughout the movement. Strength coach Shaun Pang sums it up well:
"In short, keeping your gaze straight ahead during the press is crucial for efficiency and balance" [49].
Additionally, practicing how to move your eyes independently of your head can help you maintain proper alignment during your lifts.
Addressing Common Lifting Mistakes
Many lifters struggle with gaze direction. Looking down to check foot placement or track the barbell often pulls them out of an optimal position [48]. On the flip side, looking too high can lead to excessive neck extension and leaning back, which disrupts balance and lockout mechanics. To counter these tendencies, use clear verbal and visual cues during training. Identify specific focal points in your gym and focus on maintaining postural awareness throughout each lift.
How to Apply Cues During Training
Applying cues effectively during your training is all about timing and precision. Knowing when to implement certain cues can make a big difference, especially when it comes to improving force transfer during compound lifts.
The 2–3 Cue Rule
Your brain can only handle a couple of cues at a time during heavy lifts - 2 or 3 at most. So, focus on the adjustments that will make the biggest impact on your performance for each set [53]. Start with the most essential cue that improves your force transfer, and as the movement becomes second nature, layer in additional cues.
Sequencing Cues by Lift Phase
To make cues work for you, it’s helpful to match them to the different phases of your lift. Starting with a solid foundation early on makes it easier to integrate cues as you move through each phase. Here’s how to time them effectively:
Setup Phase: This is where you establish your base. Use cues like "screw your feet into the floor", "pack your shoulders", and "eyes forward." These positioning cues set you up for better force transfer before you even start the lift.
Descent Phase (Eccentric): While lowering the weight, focus on control. Cues such as "hinge at your hips" (for squats) or "break the bar" (for bench press) are helpful here. Take your time - about 1–2 seconds - during the eccentric phase, and then transition into an explosive lift [50].
Ascent Phase (Concentric): This is where you generate power. Use cues like "push the floor away", "drive elbows under the bar", or "squeeze your glutes at lockout" to maximize force transfer during the upward movement.
Using Rest Periods Strategically
Rest periods aren’t just for recovery - they’re a chance to refine your technique. Between sets, take a moment to analyze what went well and what needs work. Use this time to review the issue, demonstrate the correct movement, and decide on the cue you’ll focus on for the next set [53]. If your form breaks during a set, finish safely, and use the rest period to address the problem before your next attempt.
Prioritizing Based on Your Goals
The cues you choose should align with your training objectives. Geoffrey Chiu from GC Performance Training highlights the importance of:
"optimizing exercise order is driven by two interrelated principles: fatigability and priority" [51].
If your goal is to build overall strength, focus on cues that improve your foundational compound lifts, like core bracing or proper setup. On the other hand, if you’re working on a specific weakness - like lockout strength - use cues that target that particular phase of the lift.
Adapting to Individual Response
Not all cues work for everyone. What clicks for one lifter might not resonate with another. Your brain can only process a few cues at a time, so it’s important to pay attention to how your body responds [54]. If a cue isn’t producing the desired effect after a few tries, rephrase it or try a different mental image. The key is finding what works for you.
Progressive Cue Integration
When starting a new training block, focus on mastering one main cue. Once that becomes automatic, add another. Over time, you can layer in a third cue if needed. This gradual approach prevents you from feeling overwhelmed and helps you build confidence as you refine each movement pattern.
Using CueForm AI for Better Form Analysis
Advancing beyond traditional cue-based techniques, modern tools now make it possible to analyze form with precision. This kind of objective feedback can speed up cue mastery and improve how effectively force is transferred during lifts.
CueForm AI leverages advanced pose-tracking technology to evaluate your movements during major lifts like squats, bench presses, and deadlifts. By comparing your form to ideal movement patterns, it identifies flaws in force transfer that might go unnoticed in a mirror or during the lift itself [55].
The system provides real-time feedback on subtle form issues, such as knee valgus or uneven bar paths, while tracking joint alignment, movement tempo, and overall body positioning throughout each lift [55][56]. For example, if your hips rise too quickly during a squat, CueForm AI might suggest cues like “hinge at your hips” or “lead with the chest” to help you maintain proper alignment. These insights are then used to create personalized cue recommendations that target your specific technique needs.
Unlike generic advice, CueForm AI tailors its feedback to your unique movement patterns. If the system detects tension loss in your upper back during a bench press, it might recommend focusing on cues like “pack your shoulders” or “break the bar” to enhance stability and control.
One of its standout features is the ability to catch imbalances early, reducing the risk of injury. By identifying movement inconsistencies or risky patterns before they escalate, the AI helps you avoid compensatory movements that could place unnecessary stress on your joints and tissues [55].
Progress tracking is another key benefit. With regular video analysis, you can objectively monitor how your form evolves over time and determine which cues work best for you. This data-driven approach eliminates the guesswork from refining your technique, making each session more productive.
The conversational AI coach feature adds another layer of usability. If you're struggling with a specific cue or want to understand why a form breakdown is happening, the AI can provide detailed explanations and alternative strategies. This bridges the gap between automated analysis and the kind of personalized coaching you'd get from an experienced trainer. These tools integrate seamlessly into your routine, complementing the cue strategies discussed earlier.
For lifters who train solo or don’t have regular access to coaches, CueForm AI offers invaluable external feedback. It objectively evaluates your movements, removing the subjectivity of self-assessment or the varying opinions of different observers.
The platform is available through different subscription tiers. The Starter plan, priced at $10 per month, includes 100 full reviews - perfect for dedicated lifters who want consistent form analysis. There’s also a free trial option, so you can explore the system and see how it fits into your training approach.
Conclusion
To master force transfer, focus on applying well-chosen coaching cues. As Dr. John Rusin explains:
"As athletes and coaches, our results are highly depend on proper movement execution and the continuous progress towards optimizing movement patterns to build a foundation of pain-free function" [57].
Using the right cues creates a solid framework for refining your lifting technique and improving performance.
External cues stand out as particularly effective. They help you generate more force, perform additional reps, learn proper technique faster, and even reduce perceived exertion during workouts [52] [58]. For example, cues like "push the floor away" or "break the bar" tap into your body’s natural mechanics, enhancing coordination. As FitFixNow puts it:
"proper cuing can be the difference between a client progressing effectively and reaching their fitness goals, or struggling with improper form and risking injury" [59].
Each cue works to build targeted tension, ensuring optimal force transfer throughout your kinetic chain. This highlights the importance of tailoring cue selection to fit individual needs.
The real challenge is identifying which cues align best with your learning style and movement patterns. While some lifters respond strongly to direct cues like "break the bar", others might benefit more from subtle prompts like "lead with the chest." Tools like CueForm AI offer a modern solution, analyzing your movement patterns and suggesting cues tailored to your specific requirements.
Whether you’re just starting out or looking to refine your technique, these cues form the foundation for safer and more effective training. Paired with objective feedback from tools like CueForm AI, you can fast-track your progress, improve movement quality, and set yourself up for long-term success in the gym.
FAQs
What are some effective external cues to improve force transfer during lifts?
Using external cues can sharpen your focus on the goal of your movement, boosting both power and efficiency. Take the deadlift, for instance - imagine pushing the floor away with your feet. In a bench press, think about spreading the bar apart or flaring your elbows to activate the right muscles.
These straightforward, action-driven cues can significantly enhance your performance by promoting proper muscle engagement and alignment. Making them a regular part of your training not only helps you tap into your strength potential but also lowers the chance of injuries.
What are some common mistakes to watch out for when using cues like 'screw your feet into the floor' or 'push the floor away' during lifts?
One frequent misstep is not fully engaging your glutes, which can compromise stability and hinder the effective transfer of force. Another common error is letting your feet rotate too much, shift out of position, or lose contact with the ground. This can lead to instability and even increase the risk of injury.
To address these problems, make sure your feet remain firmly planted on the ground, with pressure evenly distributed across the entire foot. Avoid over-rotating or letting your heels lift off the ground as you apply these techniques. Focusing on proper form will help you lift more efficiently and safely.
How does CueForm AI improve lifting form and boost performance?
CueForm AI leverages advanced video analysis to pinpoint form issues during exercises like squats, bench presses, and deadlifts. It delivers customized cues designed to help you refine your technique, leading to better force transfer, greater efficiency, and a lower chance of injury.
By providing feedback specifically tailored to your movements, CueForm AI helps you fine-tune your performance and work toward your strength training goals with greater precision.
Related Blog Posts
Plans
Choose the plan that best fits your needs.
Free
Try it out
Starter
Perfect for fitness enthusiasts